Kategori: Elektronika
Current Sense Resistor, Shunt Resistor
Here is a practical example of shunt resistor selection for an MPPT based solar charge controller circuit. The below circuit uses LT3652, an MPPT charge controller from Linear Technology (Analog devices). However, If we look carefully, the battery that will be charged through this circuit is the load.
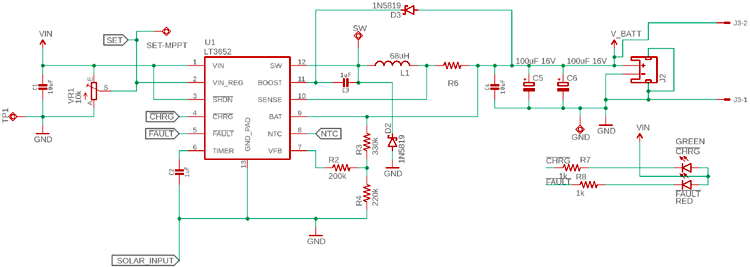
The load is connected using a shunt resistor R6. The R6 will determine the charge current, which means the voltage drop of this R6 will remain constant in every case as V = I x R. The R will be constant, the V will be constant, the driver will change the charge current.
To select the shunt resistor, the following things will be required-
- The constant voltage that will be used by the driver IC LT3652
- The maximum charge current that is required to be delivered to the battery through the resistor.
- Since it is a charge controller tolerance could be 1%.
As per the LT3652 datasheet, the sense pin will use 100 mV (0.1V) sense voltage that will be constant. Also, the maximum charge current LT3652 supports is 2A. Thus, the Shunt Resistor value needs to be R = V / I or Shunt resistor value will be 0.1V / 2A = 0.05 Ohms or 50 mili-ohms.
The power rating of this resistor needs to be P = I2R or P = 22 x 0.05 = 0.2 Watt. The close value of the shunt resistor will be 50 mili-ohms, 1% rated, 0.25 Watt. But instead of 0.25 Watt, 0.375 Watt is the safe resistor wattage that can be used.
Membuat Motion Capture
Menggunakan SharpDX untuk Joystick
Tambahkan paket NuGet SharpDX.DirectInput
using System;
using System.Threading;

using SharpDX.DirectInput;

namespace PanelRosita
{

    public enum ButtonState : int
    {
        Idle = -1,
        Released = 0,
        Pressed = 128
    }

    public class JoystickThread
    {
        public Thread thr;
        public bool conditionToExitReceived = false;
        public bool isJoystickDetected = false;

        public JoystickThread(string name)
        {

            // detecting joystick
            // Initialize DirectInput
            var directInput = new DirectInput();

            // Find a Joystick Guid
            var joystickGuid = Guid.Empty;

            var devInstance = new DeviceInstance();

            foreach (var deviceInstance in directInput.GetDevices(DeviceType.Gamepad,
                        DeviceEnumerationFlags.AllDevices))
            {
                joystickGuid = deviceInstance.InstanceGuid;
                devInstance = deviceInstance;
            }

            // If Gamepad not found, look for a Joystick
            if (joystickGuid == Guid.Empty)
                foreach (var deviceInstance in directInput.GetDevices(DeviceType.Joystick,
                        DeviceEnumerationFlags.AllDevices))
                {
                    joystickGuid = deviceInstance.InstanceGuid;
                    devInstance = deviceInstance;
                }

            // If Joystick not found, throws an error
            if (joystickGuid == Guid.Empty)
            {
                Console.WriteLine("No joystick/Gamepad found.");
                conditionToExitReceived = true;
                throw new Exception("No joystick/Gamepad found.");
            }

            // Instantiate the joystick
            var joystick = new Joystick(directInput, joystickGuid);
            Console.WriteLine("Found Joystick/Gamepad with GUID: {0}", joystickGuid);


            thr = new Thread(() => RunThread(joystick) );
            thr.Name = name;
            thr.Start();
            isJoystickDetected = true;
        }

        // Enetring point for thread
        void RunThread(Joystick joystick)
        {


            // Query all suported ForceFeedback effects
            Console.WriteLine("Effect:");
            var allEffects = joystick.GetEffects();
            foreach (var effectInfo in allEffects)
                Console.WriteLine("Effect available {0}", effectInfo.Name);

            // Set BufferSize in order to use buffered data.
            joystick.Properties.BufferSize = 128;

            // Acquire the joystick
            joystick.Acquire();

            try
            {
                while (true)
                {
                    if (conditionToExitReceived) // what im waiting for...
                    {
                        Console.WriteLine("Thread is finished");
                        break;
                    }
                    Thread.Sleep(10); // wait 1 second for something to happen.
                    doStuff(ref joystick);
                }
                //perform cleanup if there is any...

            }
            catch (ThreadAbortException ex)
            {
                Console.WriteLine("Thread " + thr.Name + " is aborted and the code is "
                                                 + ex.ExceptionState);
            }
        }

        private void doStuff(ref Joystick joystick)
        {

            try
            {
                joystick.Poll();


                var datas = joystick.GetBufferedData();
                foreach (var state in datas)
                {
                    JoystickButtonPressedEventArgs args = new JoystickButtonPressedEventArgs();
                    JoystickButtonPOVEventArgs povargs = new JoystickButtonPOVEventArgs();
                    args.Value = (ButtonState)state.Value;
                    args.ButtonOffset = state.RawOffset;
                    args.TimeStamp = DateTime.Now;

                    povargs.Value = state.Value;

                    if (state.Offset == JoystickOffset.Buttons0)
                    {
                        OnJoystickButton0(args);
                    }
                    if (state.Offset == JoystickOffset.PointOfViewControllers0)
                    {
                        OnJoystickPointOfViewControllers0(povargs);
                    }

                    if (state.Offset != JoystickOffset.X && state.Offset != JoystickOffset.Y && state.Offset != JoystickOffset.RotationZ)
                    {
                        Console.WriteLine("Joystick: " + state);
                    }
                }
            }
            catch (Exception ee)
            {
                OnJoystickDisconnected(ee.Message);
                conditionToExitReceived = true;
                Console.WriteLine("Joystick: " + ee);
                isJoystickDetected = false;
            }
        }

        public class JoystickButtonPressedEventArgs : EventArgs
        {
            public ButtonState Value { get; set; }
            public int ButtonOffset { get; set; }
            public DateTime TimeStamp { get; set; }
        }
        public class JoystickButtonPOVEventArgs : EventArgs
        {
            public int Value { get; set; }
            public int ButtonOffset { get; set; }
            public DateTime TimeStamp { get; set; }
        }

        public event EventHandler<String> OnDisconnected0;
        protected virtual void OnJoystickDisconnected(String e)
        {
            EventHandler<String> handler = OnDisconnected0;
            if (handler != null)
            {
                handler(this, e);
            }
        }

        public event EventHandler<JoystickButtonPressedEventArgs> OnButton0;
        protected virtual void OnJoystickButton0(JoystickButtonPressedEventArgs e)
        {
            EventHandler<JoystickButtonPressedEventArgs> handler = OnButton0;
            if (handler != null)
            {
                handler(this, e);
            }
        }
        public event EventHandler<JoystickButtonPOVEventArgs> OnPointOfViewControllers0;
        protected virtual void OnJoystickPointOfViewControllers0(JoystickButtonPOVEventArgs e)
        {
            EventHandler<JoystickButtonPOVEventArgs> handler = OnPointOfViewControllers0;
            if (handler != null)
            {
                handler(this, e);
            }
        }


    }
}
Penggunaan
       JoystickThread jt;
       private void Form1_Load(object sender, EventArgs e)
        {
            ConnectingToJoystick(FindingJoystick());
        }


        private void ErrorBox(string v)
        {
            MessageBox.Show(v,Application.ProductName, MessageBoxButtons.OK, MessageBoxIcon.Error, MessageBoxDefaultButton.Button1);
        }

        private void ConnectingToJoystick(bool joystickDetected)
        {
            if (joystickDetected)
            {
                try
                {
                    jt = new JoystickThread("JoyStick");
                    if (jt.isJoystickDetected)
                    {
                        //add all event here
                        jt.OnButton0 += Jt_OnButton0;
                        jt.OnDisconnected0 += Jt_OnDisconnected0;
                        jt.OnPointOfViewControllers0 += Jt_OnPointOfViewControllers0;
                        jt.isJoystickDetected = true;
                    }
                    else {
                        ErrorBox("Joystick tidak terdeteksi atau tidak kompatibel");
                    }
                }
                catch (Exception ee)
                {
                    ErrorBox("Joystick:" + ee.Message);
                }
            }
        }


        private static bool FindingJoystick()
        {
            Boolean joystickDetected = false;

            // Initialize DirectInput
            var directInput = new DirectInput();

            while (!joystickDetected)
            {

                var devInstance = new DeviceInstance();

                // Find a Joystick Guid
                var joystickGuid = Guid.Empty;

                foreach (var deviceInstance in directInput.GetDevices(DeviceType.Gamepad,
                            DeviceEnumerationFlags.AllDevices))
                {
                    joystickGuid = deviceInstance.InstanceGuid;
                    devInstance = deviceInstance;
                }

                // If Gamepad not found, look for a Joystick
                if (joystickGuid == Guid.Empty)
                    foreach (var deviceInstance in directInput.GetDevices(DeviceType.Joystick,
                            DeviceEnumerationFlags.AllDevices))
                    {
                        joystickGuid = deviceInstance.InstanceGuid;
                        devInstance = deviceInstance;
                    }

                // If Joystick not found, throws an error
                if (joystickGuid == Guid.Empty)
                {
                    Console.WriteLine("No joystick/Gamepad found.");
                    DialogResult rst = MessageBox.Show("Joystick tidak ditemukan atau tidak terhubung. Hubungkan joystick dan klik RETRY, atau klik CANCEL untuk tidak menggunakan joystick.", Application.ProductName, MessageBoxButtons.RetryCancel, MessageBoxIcon.Warning);
                    if (rst == DialogResult.Cancel)
                    {
                        return joystickDetected;
                    }
                }
                else
                {
                    joystickDetected = true;
                }
            }
            return joystickDetected;
        }

       private void Jt_OnDisconnected0(object sender, string e)
        {
            //stop robot

            //Finding joystick
            DialogResult rst = MessageBox.Show("No Joystick found. Please Connect the joystick.", Application.ProductName, MessageBoxButtons.RetryCancel, MessageBoxIcon.Warning);
            if (rst == DialogResult.Retry)
            {
                ConnectingToJoystick(FindingJoystick());
            }
        }

        private void Jt_OnPointOfViewControllers0(object sender, JoystickThread.JoystickButtonPOVEventArgs e)
        {
            MessageBox.Show("POV value: "+e.Value.ToString());
        }

        private void Jt_OnButton0(object sender, JoystickThread.JoystickButtonPressedEventArgs e)
        {
            String state = "";
            if (e.Value == ButtonState.Pressed)
                state = "Pencet";
            else
                state = "Lepas";

            //Invoke state to button1
            //button1.Invoke(new Action(() => button1.Text = state));

        }


        //Add event on FormClosing to release object
        private void Form1_FormClosing(object sender, FormClosingEventArgs e)
        {
            if (jt != null)
            {
                //force to abort
                //jt.thr.Abort("aborted from Main");

                //ask thread to exit polling
                jt.conditionToExitReceived = true;

                // Waiting for a thread to terminate.
                jt.thr.Join();
                Console.WriteLine(jt.thr.Name + " is terminate");
            }
        }
Printer POS USB menggunakan PHP
<?php
$tmpdir = sys_get_temp_dir();   # ambil direktori temporary untuk simpan file.
$file =  tempnam($tmpdir, 'ctk');  # nama file temporary yang akan dicetak (Windows, samba)

$handle = fopen($file, 'w');


//Printer parameter (ESC POS Command)
$initialized = chr(27).chr(64);

$justify = Chr(27) . Chr(97);
$left = Chr(0); $center = Chr(1);$right = Chr(2);

$fontwidth = Chr(27).Chr(87);
$doublewidth = Chr(1); $normalwidth = Chr(0);

$LF = Chr(10);

//Start making data
$Data  = $initialized;
$Data .= $fontwidth.$doublewidth;
$Data .= $justify.$center;
$Data .= "NAMA TOKO"."\n";
$Data .= $fontwidth.$normalwidth;
$Data .= "Alamat Toko"."\n";
$Data .= $LF.$LF;

//Write data to temporary file
fwrite($handle, $Data);
fclose($handle);

//WIN: send temporary file to nerwork shared printer (share your printer)
//LINUX: send data directly to device
if (strtoupper(substr(PHP_OS, 0, 3)) === 'WIN'){ //Win
    copy($file, "//localhost/POS-58");  # Shared Printer as POS-58
}else if (strtoupper(substr(PHP_OS, 0, 3)) === 'LIN'){ //Linux
    $device = "/dev/usb/lp0";           # Print at lp0, find it using lsusb! Use udev for managing user access
    if (is_writable($device)) {
        $fp =fopen($device, "w");
        if($fp) {
            fwrite($fp, $Data);
            fclose($fp);
        }
    }
}

unlink($file);
//echo $Data;

?>
Cara mencetak ke printer POS menggunakan PHP. Skrip ini mencontohkan jika menggunakan Windows maupun Linux.
Untuk menggunakan Windows maupun Linux, printer dibuat menjadi akses bersama (shared printer) terlebih dahulu lalu beri nama, misalnya: POS-58. Pastikan bisa diakses di //ALAMAT_IP/NAMA_PRINTER. Untuk skrip ini, menggunakan //localhost/POS-58 Untuk di Windows, buka di Control Panel, pastikan printer yang di-share sudah tersedia dan online.
Sedangkan jika menggunakan Linux, cari nama device dengan perintah:
ls /dev/usbalamat device printer akan diawali dengan lpx, dimana x bisa 0,1,2 atau angka yang lain. Bagaimana bisa memastikan mana alamat device yang benar? gunakan perintah berikut:
echo "Test Printer" >> /dev/usb/lp0 Jika printer bisa mencetak, berarti alamat printer adalah benar, yaitu /dev/usb/lp0 jika salah ganti angka 0 dengan angka 1 atau 2 atau angka lain hingga printer bisa mencetak. Pada skrip ini, alamat device perinter adalah /dev/usb/lp0
Penerima Waktu Tunda WiFi

#ifdef ESP32
#include <esp_now.h>
#include <WiFi.h>
#else
#include <espnow.h>
#include <ESP8266WiFi.h>
#define ESP_OK 0
#endif

#define lampPin 0

bool lampON = false;
bool lock = false;


// struktur untuk pengiriman data harus sama dengan struktur pada penerima
typedef struct struct_message {
  int id;     //id pengirim, lock counter
  int x;      //on interval counter
  int y;      //motion (>0)
} struct_message;

struct_message myData;

// Membuat struktur untuk tiap board
struct_message board1;

struct_message boardsStruct[3] = {board1};

volatile int counter = 0;
int max_counter = 0;
int lock_counter = 1;

// callback saat data diterima
#ifdef ESP32
void OnDataRecv(const uint8_t * mac_addr, const uint8_t *incomingData, int len)
#else
void OnDataRecv(uint8_t * mac_addr, uint8_t *incomingData, uint8_t len)
#endif
{
  char macStr[18];
  Serial.print("Paket diterima dari: ");
  snprintf(macStr, sizeof(macStr), "%02x:%02x:%02x:%02x:%02x:%02x",
           mac_addr[0], mac_addr[1], mac_addr[2], mac_addr[3], mac_addr[4], mac_addr[5]);
  Serial.println(macStr);
  memcpy(&myData, incomingData, sizeof(myData));
  Serial.printf("Board ID %u: %u bytes\n", myData.id, len);
  // Update the structures with the new incoming data
  boardsStruct[myData.id - 1].x = myData.x;
  boardsStruct[myData.id - 1].y = myData.y;
  Serial.printf("x value: %d \n", boardsStruct[myData.id - 1].x);
  Serial.printf("y value: %d \n", boardsStruct[myData.id - 1].y);
  Serial.println();

  if (!lock) counter = 0;

}


void setup() {
  Serial.begin(74880);
  Serial.println();
  Serial.print("ESP Board MAC Address:  ");
  Serial.println(WiFi.macAddress());

  WiFi.mode(WIFI_STA);

  //Init ESP-NOW
  if (esp_now_init() != ESP_OK) {
    Serial.println("Error initializing ESP-NOW");
    return;
  }

  //daftrakan callback
  esp_now_register_recv_cb(OnDataRecv);

  pinMode(lampPin, OUTPUT);
  Serial.println("Turn Off lamp");
  digitalWrite(lampPin, LOW);
  lampON = false;
}


void loop() {
  // Mengakses data dari setiap board
  //Serial.println(boardsStruct[0].x,DEC);
  //delay(1000);

  //update counter
  if (boardsStruct[0].x > 0)
    max_counter = boardsStruct[0].x;

  if (boardsStruct[0].id > 0)
    lock_counter = boardsStruct[0].id;

  //get motion information and restart counter?
  if (boardsStruct[0].y > 0 && counter == 0) {
    if (!lampON) {
      Serial.println("Turn On lamp");
        digitalWrite(lampPin, HIGH);

      lampON = true;
    }
  }


  //stop counter turn off lamp
  if (counter >= max_counter && lampON) {
    Serial.println("Turn Off lamp");
  digitalWrite(lampPin, LOW);
    lampON = false;
    lock = true;
    Serial.println("Lock");
    delay(lock_counter * 1000);
    Serial.println("Release");
    lock = false;
  }

  if (lampON) {
    counter++;
    Serial.print(max_counter - counter);
    delay(1000);
  }

}
Memulai Percobaan ESP-CAM


ESP-CAM memiliki LED pada pin GPIO33. LED ini akan kita gunakan untuk percobaan mati nyala kedip kedip.
Kode Blink pada Arduino
#define LED_BUILTIN 33    //LED ada di GPIO33

void setup() {
  pinMode(LED_BUILTIN, OUTPUT);
}

void loop() {
  digitalWrite(LED_BUILTIN, HIGH);
  delay(1000);
  digitalWrite(LED_BUILTIN, LOW);
  delay(1000);
}
Konfigurasi pilihan Board

Hubungkan USB-Serial atau dapat pula menggunakan Arduino (TX-TX, RX-RX)

Jika sudah berhasil Upload, lepas hubungan GND dengan GPIO0 (Kabel abu-abu) dan tekan reset.
Pengiriman Peer-to-Peer MCU ESP

Pengiriman dilakukan oleh LOLIN32 dengan MCU ESP32 sedangkan penerimaan dilakukan oleh ESP01 dengan MCU ESP8266. Potokol pengiriman menggunakan ESP-NOW. ESP-NOW adalah salah satu protokol hibungan WiFi yang dibesut oleh Espressif.
Skrip Pengiriman yang dibenamkan di LOLIN32
#ifdef ESP32
#include <esp_now.h>
#include <WiFi.h>
#else
#include <espnow.h>
#include <ESP8266WiFi.h>
typedef enum {ESP_NOW_SEND_SUCCESS = 0, ESP_NOW_SEND_FAIL};
typedef enum {ESP_OK = 0} esp_err_t;
#endif


// Ganti dengan MAC penerima
uint8_t broadcastAddress[] = {0x50, 0x02, 0x91, 0xFE, 0x4C, 0x01};

// ID harus unik
const int id = 1;

// struktur untuk pengiriman data harus sama dengan struktur pada penerima
typedef struct struct_message {
  int id;
  int x;
  int y;
} struct_message;

struct_message myData;

// callback saat data dikirim
#ifdef ESP32
void OnDataSent(const uint8_t *mac_addr, esp_now_send_status_t status)
#else
void OnDataSent(uint8_t *mac_addr, uint8_t status)
#endif
{
  Serial.print("Status pengiriman:\t");
  Serial.println(status == ESP_NOW_SEND_SUCCESS ? "Sukses" : "Gagal");
}

void setup() {
  Serial.begin(115200);
  WiFi.mode(WIFI_STA);

  // Init ESP-NOW
  if (esp_now_init() != ESP_OK) {
    Serial.println("Gagal inisialisasi ESP-NOW");
    return;
  }
#ifdef ESP32
#else
  esp_now_set_self_role(ESP_NOW_ROLE_CONTROLLER);

#endif
  // registrasi ke penerima dan cek status paket
  esp_now_register_send_cb(OnDataSent);

  // Registrasi peer
#ifdef ESP32
  esp_now_peer_info_t peerInfo;
  memcpy(peerInfo.peer_addr, broadcastAddress, 6);
  peerInfo.channel = 0;
  peerInfo.encrypt = false;

  // Menambahkan diri peer
  if (esp_now_add_peer(&peerInfo) != ESP_OK) {
    Serial.println("Gagal menambahkan peer");
    return;
  }
#else
  if (esp_now_add_peer(broadcastAddress, ESP_NOW_ROLE_SLAVE, 1, NULL, 0) != ESP_OK) {
    Serial.println("Gagal menambahkan peer");
    return;
  }
#endif
}

void loop() {
  // Nilai untuk dikirim
  myData.id = 1;
  myData.x = random(0, 50);
  myData.y = random(0, 50);

  Serial.print("x:"); Serial.println(myData.x, DEC);
  Serial.print("y:"); Serial.println(myData.y, DEC);
  // Kirim pesan

#ifdef ESP32
  esp_err_t result;
#else
  int result;
#endif
  result = esp_now_send(broadcastAddress, (uint8_t *) &myData, sizeof(myData));

  if (result == ESP_OK) {
    Serial.println("Permintaan pengiriman berhasil");
  }
  else {
    Serial.println("Gagal mengirim data");
  }
  delay(10000);
}
Skrip penerima yang dibenamkan di ESP01
#ifdef ESP32
  #include <esp_now.h>
  #include <WiFi.h>
#else
  #include <espnow.h>
  #include <ESP8266WiFi.h>
  #define ESP_OK 0
#endif

 // struktur untuk pengiriman data harus sama dengan struktur pada penerima
typedef struct struct_message {
  int id;
  int x;
  int y;
}struct_message;

struct_message myData;

// Membuat struktur untuk tiap board
struct_message board1;

struct_message boardsStruct[3] = {board1};

// callback saat data diterima
#ifdef ESP32
void OnDataRecv(const uint8_t * mac_addr, const uint8_t *incomingData, int len)
#else
void OnDataRecv(uint8_t * mac_addr, uint8_t *incomingData, uint8_t len)
#endif
{
  char macStr[18];
  Serial.print("Paket diterima dari: ");
  snprintf(macStr, sizeof(macStr), "%02x:%02x:%02x:%02x:%02x:%02x",
           mac_addr[0], mac_addr[1], mac_addr[2], mac_addr[3], mac_addr[4], mac_addr[5]);
  Serial.println(macStr);
  memcpy(&myData, incomingData, sizeof(myData));
  Serial.printf("Board ID %u: %u bytes\n", myData.id, len);
  // Update the structures with the new incoming data
  boardsStruct[myData.id-1].x = myData.x;
  boardsStruct[myData.id-1].y = myData.y;
  Serial.printf("x value: %d \n", boardsStruct[myData.id-1].x);
  Serial.printf("y value: %d \n", boardsStruct[myData.id-1].y);
  Serial.println();
}

void setup(){
  Serial.begin(74880);
  Serial.println();
  Serial.print("ESP Board MAC Address:  ");
  Serial.println(WiFi.macAddress());

   WiFi.mode(WIFI_STA);

  //Init ESP-NOW
  if (esp_now_init() != ESP_OK) {
    Serial.println("Error initializing ESP-NOW");
    return;
  }

  //daftrakan callback
  esp_now_register_recv_cb(OnDataRecv);
}

void loop() {
  // Mengakses data dari setiap board
  //Serial.println(boardsStruct[0].x,DEC);
  delay(1000);
}
Hasil proses pengiriman lewat seriam monitor

Konfigurasi Perangkat Keras

Cara memprogram ESP01
Wiring dengan Modul Serial

Wiring dengan USB-TTL (Gunakan yang support 3,3 Volt) atau dapat juga menggunakan Board Arduino

(Jika mengunakan board Arduino, hubungkan RX ke RX dan TX ke TX)
Pilihan Setting Board
Board: “Generic ESP Module”
Flash Mode: “DIO” (Gunakan DOUT jika checksum error)
Flash Frequency: “40MHz”
CPU Frequency: “80 MHz”
Flash Size: “1M (64K SPIFFS)”
Debug Port: “Disabled”
Debug Level: “None”
Reset Method: “ck”
Upload Speed: “115200”

Contoh kode untuk blink (LED pada GPIO0)
/*
 *  ESP01
 *  Upload Configuration:
 *  Generic 8266
 *  Flash Mode: DOUT (Using: DIO --> checksum Error)
 *  Debug: None
 *  Reset: ck
 *  CPU: 80Mhz
 *  Flash: 1M (64K)
 *  Debug Port: Disable
 *  Flash: 40Mhz
 *  Upload Speed: 115200
 *
 *  Flashing ESP-01 using Esp8266 Serial Module Board
 *  Connect GPIO0 to GND
 *
 *  Flash ESP-01 using USB to TTL
 *  Connect GPIO0 to GND, EN to 3V3, RX-TX, TX-RX
 */

#define D3  0 //GPIO0
#define D4  2 //GPIO2
void setup() {
  //GPIO0
  pinMode(D3, OUTPUT);
  Serial.begin(74880);
}
void loop() {
  digitalWrite(D3, LOW); // turn the LED on (HIGH is the voltage level)
  delay(1000); // wait for a second
  digitalWrite(D3, HIGH); // turn the LED off by making the voltage LOW Serial.println("LOW");
  delay(1000); // wait for a second
  Serial.println("OK");
}
Untuk menjalankan hasil programming, lepas kabel IO0 terhadap GND dan lalukan reset (atau cabut pasang modul)
sumber: https://www.diyhobi.com/flash-program-esp-01-using-usb-serial-adapter/
Mengirim Date ke Banyak Board dengan ESP_NOW

Mencari alamat MAC penerima
#ifdef ESP32
  #include <WiFi.h>
#else
  #include <ESP8266WiFi.h>
#endif

void setup(){
  Serial.begin(115200);
  Serial.println();
  Serial.print("ESP Board MAC Address:  ");
  Serial.println(WiFi.macAddress());
}

void loop(){

}

Pengirim Data
#include <esp_now.h>
#include <WiFi.h>

// Ganti dengan MAC address penerima
uint8_t broadcastAddress1[] = {0x3C, 0x71, 0xBF, 0xC3, 0xBF, 0xB0};
uint8_t broadcastAddress2[] = {0x24, 0x0A, 0xC4, 0xAE, 0xAE, 0x44};
uint8_t broadcastAddress3[] = {0x80, 0x7D, 0x3A, 0x58, 0xB4, 0xB0};

typedef struct test_struct {
  int x;
  int y;
} test_struct;

test_struct test1;
test_struct test2;
test_struct test3;

// callback saat pengiriman data
void OnDataSent(const uint8_t *mac_addr, esp_now_send_status_t status) {
  char macStr[18];
  Serial.print("Ditujukan : ");
  // Copies the sender mac address to a string
  snprintf(macStr, sizeof(macStr), "%02x:%02x:%02x:%02x:%02x:%02x",
           mac_addr[0], mac_addr[1], mac_addr[2], mac_addr[3], mac_addr[4], mac_addr[5]);
  Serial.print(macStr);
  Serial.print(" status:\t");
  Serial.println(status == ESP_NOW_SEND_SUCCESS ? "Sukses" : "Gagal");
}

void setup() {
  Serial.begin(115200);

  WiFi.mode(WIFI_STA);

  if (esp_now_init() != ESP_OK) {
    Serial.println("Gagal inisialisasi ESP-NOW");
    return;
  }

  esp_now_register_send_cb(OnDataSent);

  // pendaftaran peer
  esp_now_peer_info_t peerInfo;
  peerInfo.channel = 0;
  peerInfo.encrypt = false;

  // peer  pertama
  memcpy(peerInfo.peer_addr, broadcastAddress1, 6);
  if (esp_now_add_peer(&peerInfo) != ESP_OK){
    Serial.println("Gagal menambahkan peer");
    return;
  }
  //  peer kedua
  memcpy(peerInfo.peer_addr, broadcastAddress2, 6);
  if (esp_now_add_peer(&peerInfo) != ESP_OK){
    Serial.println("Gagal menambahkan peer");
    return;
  }
  /// peer ketiga
  memcpy(peerInfo.peer_addr, broadcastAddress3, 6);
  if (esp_now_add_peer(&peerInfo) != ESP_OK){
    Serial.println("Gagal menambahkan peer");
    return;
  }
}

void loop() {
  //masukkan data padda struktur
  test1.x = random(0,20);
  test1.y = random(0,20);
  test2.x = random(0,20);
  test2.y = random(0,20);
  test3.x = random(0,20);
  test3.y = random(0,20);

  //kirim paket data test1 ke semua board
  esp_err_t result = esp_now_send(0, (uint8_t *) &test1, sizeof(test_struct));

  if (result == ESP_OK) {
    Serial.println("Terkirim ke semua board");
  }
  else {
    Serial.println("Gagal mengirim");
  }

  //kirim paket data test1,test2, test3 ke maing-masing board
  result = esp_now_send(broadcastAddress1, (uint8_t *) &test1, sizeof(test_struct));
  if (result == ESP_OK) {
    Serial.println("Terkirim ke board 1");
  }
  else {
    Serial.println("Gagal mengirim board 1");
  }

  result = esp_now_send(broadcastAddress2, (uint8_t *) &test2, sizeof(test_struct));
  if (result == ESP_OK) {
    Serial.println("Terkirim ke board 2");
  }
  else {
    Serial.println("Gagal mengirim board 2");
  }

  result = esp_now_send(broadcastAddress3, (uint8_t *) &test3, sizeof(test_struct));

  if (result == ESP_OK) {
    Serial.println("Terkirim ke board 3");
  }
  else {
    Serial.println("Gagal mengirim board 3");
  }

  delay(2000);
}
Penerima Data
#include <esp_now.h>
#include <WiFi.h>

typedef struct test_struct {
  int x;
  int y;
} test_struct;

test_struct myData;

void OnDataRecv(const uint8_t * mac, const uint8_t *incomingData, int len) {
  memcpy(&myData, incomingData, sizeof(myData));
  Serial.print("Bytes diterima: ");
  Serial.println(len);
  Serial.print("x: ");
  Serial.println(myData.x);
  Serial.print("y: ");
  Serial.println(myData.y);
  Serial.println();
}

void setup() {
  Serial.begin(115200);

  WiFi.mode(WIFI_STA);

  //Init ESP-NOW
  if (esp_now_init() != ESP_OK) {
    Serial.println("Gagal inisialisasi ESP-NOW");
    return;
  }
  //daftarkan callback
  esp_now_register_recv_cb(OnDataRecv);
}

void loop() {

}
sumber: https://randomnerdtutorials.com/esp-now-one-to-many-esp32-esp8266/