from duckduckgo_search import DDGS
from pathlib import Path
from fastprogress.fastprogress import progress_bar
import requests
import uuid
from PIL import Image as PImage

root = Path().cwd()/"jilbabcantik"  #isikan nama folder
keywords = 'jilbab cantik'          #isikan kata kunci
max_results=20

links=[]
with DDGS(proxies="socks5://localhost:9150", timeout=20) as ddgs:
    ddgs_images_gen = ddgs.images(
      keywords,
      safesearch="off",
    )
    for r in ddgs_images_gen:
        #print(r["image"])
        links.append(r["image"])
        if len(links) >= max_results:
            break


if(len(links) == 0):
    print("Tidak ada yang bisa diunduh!");

uuid_names=True
path = Path(root)
path.mkdir(parents=True, exist_ok=True)

print("Mengunduh hasil ke dalam", path)
pbar = progress_bar(links)
pbar.comment = 'Gambar yang diunduh'

i = 1
mk_uniq = lambda : '_' + str(uuid.uuid4())[:8] if uuid_names else ''
mk_fp = lambda x: path/(str(x).zfill(3) + mk_uniq() + ".jpg")
is_file = lambda x: len(list(path.glob(str(x).zfill(3) + '*.jpg'))) > 0

while is_file(i): i += 1

results = []

for link in pbar:
      try:
        resp = requests.get(link)
        fp = mk_fp(i)
        fp.write_bytes(resp.content)

        try:
          img = PImage.open(fp)
          img.verify()
          img.close()
          results.append(Path(fp))
        except Exception as e:
          print(e)
          print(fp, " tidak valid")
          fp.unlink()
      except Exception as e:
         print(e)
         print("Terjadi pengecualian saat mengambil ", link)

      i += 1
Kategori: Web
Download MP3 dari YouTube dan situs lain degan JDownloader 2


//Add your script here. Feel free to use the available api properties and methods
if (link.finished) {
    var input = link.downloadPath;
    var output = input.replace(/(aac|m4a|ogg)$/, "mp3");

    if (input != output) {
        try {
            var ffmpeg = callAPI("config", "get", "org.jdownloader.controlling.ffmpeg.FFmpegSetup", null, "binarypath");
            var bitrate = callSync(ffmpeg, "-i", input).match(/bitrate: (\d+) kb/)[1];

            callAsync(function(error) {
                !error && getPath(input).delete();
            }, ffmpeg, "-y", "-i", input, "-b:a", bitrate + "k", output);
        } catch (e) {};
    }
}
Fix ampersamp in syntaxhighlighter
This can be done directly from the webinterface. Just go to Plugins -> Plugin Editor -> select the Plugin SyntaxHighlighter Evolved -> add the snippet to the end
/**
 * Filter to fix issue with & in SyntaxHighlighter Evolved plugin.
 *
 * @param string $code Code to format.
 * @param array $atts Attributes.
 * @param string $tag Tag.
 *
 * @return string
 */
function kagg_syntaxhighlighter_precode( $code, $atts, $tag ) {
    if ( 'code' === $tag ) {
        $code = wp_specialchars_decode( $code );
    }
    return $code;
}
add_filter( 'syntaxhighlighter_precode', 'kagg_syntaxhighlighter_precode', 10, 3 );
Sumber: https://nocin.eu/wordpress-syntaxhighlighter-ampersand-character/
PTZ Control on ONVIF Standard in C#
Looking at highly price Camera SDK to handle ONVIF Standard, I decided to build some code to control PTZ camera movement using C#.
It it a nice tutorial video by Onvif Channel. That video describes basic step to make a C# project on visual studio. Unfortunately, I can’t get it work for my camera. I’m having YooSee camera GW-1113 which is already support PTZ Control.
There is another tutorial in CodeProject to use PTZ Control. My code is always get a closed connection message from the camera. Both using password or nor, it alway failed. Next, I got nice tool to cek my Onvif Camera. It can detect camera’s IP, port, display video stream and controlling camera using PTZ. You can get it here https://sourceforge.net/projects/onvifdm/ Afterward, I got IP, Port, and service.
With correct IP, Password, port and service address, it still error on getProfiles() command. I inisiate to find tool to debug Onvif request. I grab this tool in this forum https://support.yooseecamera.com/threads/233/ Nice step by step tutorial with pictures. I made my dummy service and dump post header request and then save it into textfile. Here is PHP code i got from // https://gist.github.com/magnetikonline/650e30e485c0f91f2f40 to dump request. I save it on http://localhost:5000/onvif/device_service/index.php
<?php

class DumpHTTPRequestToFile {

	public function execute($targetFile) {

		$data = sprintf(
			"%s %s %s\n\nHTTP headers:\n",
			$_SERVER['REQUEST_METHOD'],
			$_SERVER['REQUEST_URI'],
			$_SERVER['SERVER_PROTOCOL']
		);

		foreach ($this->getHeaderList() as $name => $value) {
			$data .= $name . ': ' . $value . "\n";
		}

		$data .= "\nRequest body:\n";

		file_put_contents(
			$targetFile,
			$data . file_get_contents('php://input') . "\n"
		);

		echo("Done!\n\n");
	}

	private function getHeaderList() {

		$headerList = [];
		foreach ($_SERVER as $name => $value) {
			if (preg_match('/^HTTP_/',$name)) {
				// convert HTTP_HEADER_NAME to Header-Name
				$name = strtr(substr($name,5),'_',' ');
				$name = ucwords(strtolower($name));
				$name = strtr($name,' ','-');

				// add to list
				$headerList[$name] = $value;
			}
		}

		return $headerList;
	}
}


(new DumpHTTPRequestToFile)->execute('./dumprequest.txt');
exit();
And here are resutl I got from C# and Device Test Tool
POST /onvif/device_service/index.php HTTP/1.1

HTTP headers:
Host: localhost
Expect: 100-continue
Accept-Encoding: gzip, deflate
Connection: Keep-Alive

Request body:
<?xml version="1.0" encoding="utf-8"?><s:Envelope xmlns:s="http://www.w3.org/2003/05/soap-envelope"><s:Body xmlns:xsi="http://www.w3.org/2001/XMLSchema-instance" xmlns:xsd="http://www.w3.org/2001/XMLSchema"><GetCapabilities xmlns="http://www.onvif.org/ver10/device/wsdl" /></s:Body></s:Envelope>
POST /onvif/device_service/index.php HTTP/1.1

HTTP headers:
Host: localhost
Accept: */*

Request body:
<?xml version="1.0" encoding="utf-8"?><s:Envelope xmlns:s="http://www.w3.org/2003/05/soap-envelope"><s:Body xmlns:xsi="http://www.w3.org/2001/XMLSchema-instance" xmlns:xsd="http://www.w3.org/2001/XMLSchema"><GetCapabilities xmlns="http://www.onvif.org/ver10/device/wsdl" /></s:Body></s:Envelope>
Above was C# request, while next into it was Tool request You can see that the difference is only at HTTP headers section. Thus, I have to remove Expect:100-continue , gzip compression and Keep-Alive Connection (oprional). As well as add an Accept type.
            try
            {
                var messageElement = new TextMessageEncodingBindingElement()
                {
                    MessageVersion = MessageVersion.CreateVersion(
                      EnvelopeVersion.Soap12, AddressingVersion.None)
                };

                HttpTransportBindingElement httpBinding = new HttpTransportBindingElement()
                {
                    AuthenticationScheme = AuthenticationSchemes.Digest

                };
                //remove compression
                httpBinding.DecompressionEnabled = false;
                // remove keep alive
                httpBinding.KeepAliveEnabled = false;


                CustomBinding bind = new CustomBinding(messageElement, httpBinding);
                // Remove Expect
                ServicePoint servicePoint =
                    ServicePointManager.FindServicePoint(service_uri);
                servicePoint.Expect100Continue = false;

                if (searchServiceUri)
                {
                    // now execute some service operation
                    Device.DeviceClient device = new Device.DeviceClient(bind,
                      new EndpointAddress(service_uri));
                    device.ClientCredentials.HttpDigest.AllowedImpersonationLevel =
                      System.Security.Principal.TokenImpersonationLevel.Impersonation;
                    device.ClientCredentials.HttpDigest.ClientCredential.UserName = userName;
                    device.ClientCredentials.HttpDigest.ClientCredential.Password = password;

                    Device.Capabilities cap = device.GetCapabilities(null);

                }
Later I got nice php script to controlling PTZ at https://github.com/sergejey/majordomo-onvif/blob/master/modules/onvif/class.ponvif.php
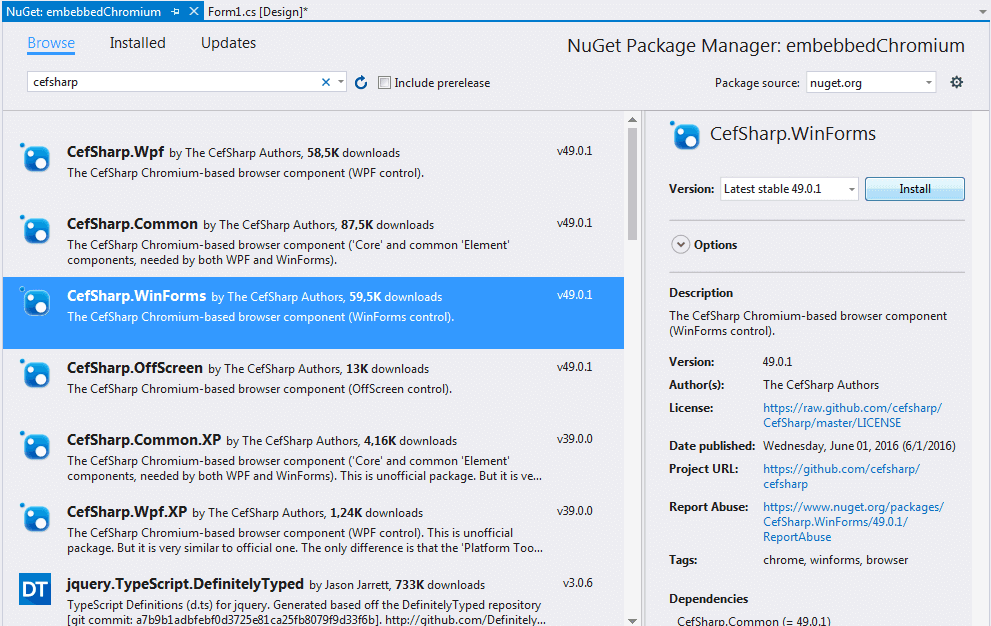
Tutorial CefSharp
Buka Menu: Project -> Manage NuGet Package
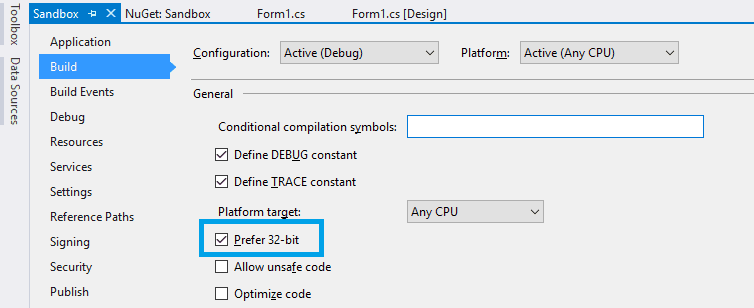
Ganti Target Net 4.5.2 keatas dan platform configuration (x86, x64 or AnyCPU)
Perbaiki file .csproj
Tambahkan sebelum tag </PropertyGroup>

<CefSharpAnyCpuSupport>true</CefSharpAnyCpuSupport>Configuration Error
jika menemukan: Please check to make sure that you have specified a valid combination of Configuration and Platform for this project. Maka buka
Klik kanan Project > Properties > Build lalu cut pada bagian Output Path. Selanjutnya Build project lalu paste lagi di tempat semula. Selanjutnya silahkan coba rebuild lagi.
program.cs
using System;
using System.Collections.Generic;
using System.Linq;
using System.Threading.Tasks;
using System.Windows.Forms;

using CefSharp;
using CefSharp.WinForms;
using System.IO;

namespace WindowsFormsApplication1
{
    static class Program
    {
        /// <summary>
        /// The main entry point for the application.
        /// </summary>
        [STAThread]
        static void Main()
        {
            Cef.EnableHighDPISupport();

            var settings = new CefSettings()
            {
                //By default CefSharp will use an in-memory cache, you need to specify a Cache Folder to persist data
                CachePath = Path.Combine(Environment.GetFolderPath(Environment.SpecialFolder.LocalApplicationData), "CefSharp\\Cache")
            };
            //Example of setting a command line argument
            //Enables WebRTC
            settings.CefCommandLineArgs.Add("enable-media-stream");

            //Perform dependency check to make sure all relevant resources are in our output directory.
            Cef.Initialize(settings, performDependencyCheck: true, browserProcessHandler: null);

            Application.EnableVisualStyles();
            Application.SetCompatibleTextRenderingDefault(false);
            Application.Run(new Form1());
        }
    }
}
Form1.cs
using System;
using System.Collections.Generic;
using System.ComponentModel;
using System.Data;
using System.Drawing;
using System.Linq;
using System.Text;
using System.Threading.Tasks;
using System.Windows.Forms;

using CefSharp;
using CefSharp.WinForms;

namespace WindowsFormsApplication1
{
    public partial class Form1 : Form
    {
        public ChromiumWebBrowser chromeBrowser;

        public Form1()
        {
            InitializeComponent();
            InitializeChromium();
        }

        public void InitializeChromium()
        {
            // Create a browser component
            //chromeBrowser = new ChromiumWebBrowser("http://admin:@192.168.43.10/video.cgi");
            chromeBrowser = new ChromiumWebBrowser("http://localhost:8001/camera/mjpeg");
            // Add it to the form and fill it to the form window.
            panel1.Controls.Add(chromeBrowser);
            chromeBrowser.Dock = DockStyle.Fill;

            //Wait for the page to finish loading (all resources will have been loaded, rendering is likely still happening)
            chromeBrowser.LoadingStateChanged += (sender, args) =>
            {
                //Wait for the Page to finish loading
                Console.WriteLine("Loading State Changed GoBack {0} GoForward {1} CanReload {2} IsLoading {3}", args.CanGoBack, args.CanGoForward, args.CanReload, args.IsLoading);
                if (args.CanReload && !args.IsLoading)
                {
                    //chromeBrowser.Reload();
                }
            };

            chromeBrowser.IsBrowserInitializedChanged += OnIsBrowserInitializedChanged;

            //Wait for the MainFrame to finish loading
            chromeBrowser.FrameLoadEnd += (sender, args) =>
            {
                //Wait for the MainFrame to finish loading
//                if (args.Frame.IsMain)
                {
                    Console.WriteLine("MainFrame finished loading Status code {0}", args.HttpStatusCode);
                    if (args.HttpStatusCode == 200)
                    {
                        //finished, OK, streaming end
                        chromeBrowser.Reload();
                    }
                    if (args.HttpStatusCode == -101)
                    {
                        //finished, OK, streaming shut down
                        chromeBrowser.Reload();
                    }
                    if (args.HttpStatusCode == 0)
                    {
                        //The client request wasn't successful.
                        chromeBrowser.Reload();
                    }
                }
            };

        }

        private void ChromeBrowser_FrameLoadEnd(object sender, FrameLoadEndEventArgs e)
        {
            Console.WriteLine("end");
        }

        private void OnLoadingStateChanged(object sender, LoadingStateChangedEventArgs e)
        {
            Console.WriteLine(chromeBrowser.IsLoading);
        }

        private void OnIsBrowserInitializedChanged(object sender, EventArgs e)
        {
            var b = ((ChromiumWebBrowser)sender);

            this.InvokeOnUiThreadIfRequired(() => b.Focus());
        }

        private void button1_Click(object sender, EventArgs e)
        {
            string url = textBox1.Text;
            if (Uri.IsWellFormedUriString(url, UriKind.RelativeOrAbsolute))
            {
                chromeBrowser.Load(url);
            }
        }
    }


    public static class ControlExtensions
    {
        /// <summary>
        /// Executes the Action asynchronously on the UI thread, does not block execution on the calling thread.
        /// </summary>
        /// <param name="control">the control for which the update is required</param>
        /// <param name="action">action to be performed on the control</param>
        public static void InvokeOnUiThreadIfRequired(this Control control, Action action)
        {
            //If you are planning on using a similar function in your own code then please be sure to
            //have a quick read over https://stackoverflow.com/questions/1874728/avoid-calling-invoke-when-the-control-is-disposed
            //No action
            if (control.Disposing || control.IsDisposed || !control.IsHandleCreated)
            {
                return;
            }

            if (control.InvokeRequired)
            {
                control.BeginInvoke(action);
            }
            else
            {
                action.Invoke();
            }
        }
    }
}
Printer POS USB menggunakan PHP
<?php
$tmpdir = sys_get_temp_dir();   # ambil direktori temporary untuk simpan file.
$file =  tempnam($tmpdir, 'ctk');  # nama file temporary yang akan dicetak (Windows, samba)

$handle = fopen($file, 'w');


//Printer parameter (ESC POS Command)
$initialized = chr(27).chr(64);

$justify = Chr(27) . Chr(97);
$left = Chr(0); $center = Chr(1);$right = Chr(2);

$fontwidth = Chr(27).Chr(87);
$doublewidth = Chr(1); $normalwidth = Chr(0);

$LF = Chr(10);

//Start making data
$Data  = $initialized;
$Data .= $fontwidth.$doublewidth;
$Data .= $justify.$center;
$Data .= "NAMA TOKO"."\n";
$Data .= $fontwidth.$normalwidth;
$Data .= "Alamat Toko"."\n";
$Data .= $LF.$LF;

//Write data to temporary file
fwrite($handle, $Data);
fclose($handle);

//WIN: send temporary file to nerwork shared printer (share your printer)
//LINUX: send data directly to device
if (strtoupper(substr(PHP_OS, 0, 3)) === 'WIN'){ //Win
    copy($file, "//localhost/POS-58");  # Shared Printer as POS-58
}else if (strtoupper(substr(PHP_OS, 0, 3)) === 'LIN'){ //Linux
    $device = "/dev/usb/lp0";           # Print at lp0, find it using lsusb! Use udev for managing user access
    if (is_writable($device)) {
        $fp =fopen($device, "w");
        if($fp) {
            fwrite($fp, $Data);
            fclose($fp);
        }
    }
}

unlink($file);
//echo $Data;

?>
Cara mencetak ke printer POS menggunakan PHP. Skrip ini mencontohkan jika menggunakan Windows maupun Linux.
Untuk menggunakan Windows maupun Linux, printer dibuat menjadi akses bersama (shared printer) terlebih dahulu lalu beri nama, misalnya: POS-58. Pastikan bisa diakses di //ALAMAT_IP/NAMA_PRINTER. Untuk skrip ini, menggunakan //localhost/POS-58 Untuk di Windows, buka di Control Panel, pastikan printer yang di-share sudah tersedia dan online.
Sedangkan jika menggunakan Linux, cari nama device dengan perintah:
ls /dev/usbalamat device printer akan diawali dengan lpx, dimana x bisa 0,1,2 atau angka yang lain. Bagaimana bisa memastikan mana alamat device yang benar? gunakan perintah berikut:
echo "Test Printer" >> /dev/usb/lp0 Jika printer bisa mencetak, berarti alamat printer adalah benar, yaitu /dev/usb/lp0 jika salah ganti angka 0 dengan angka 1 atau 2 atau angka lain hingga printer bisa mencetak. Pada skrip ini, alamat device perinter adalah /dev/usb/lp0
Percobaan cloud4pi dengan PHP
<!--?php
// A sample PHP Script to POST data using cURL
// Data in JSON format
$json= '[{"name":"Temperature","type":"numeric"},{"name":"LEDOn","type":"bool"}]';
$arr=json_decode($json, false);
echo '
<pre-->';
print_r($arr);
echo '
';
$employee_object = new stdClass;
$employee_object->name = "Temperature";
$employee_object->type = "numeric";
$employee_object1 = new stdClass;
$employee_object1->name = "LEDOn";
$employee_object1->type = "bool";
$data = array
(
$employee_object,
$employee_object1
);
$payload = json_encode($data);
echo "==>".$payload;
$token = '2HSmdfzsEAXB3puVUTi6ZoirV';
// Prepare new cURL resource
$ch = curl_init('https://cloud4rpi.io/api/devices/'.$token.'/config');
curl_setopt($ch, CURLOPT_RETURNTRANSFER, true);
curl_setopt($ch, CURLINFO_HEADER_OUT, true);
curl_setopt($ch, CURLOPT_POST, true);
curl_setopt($ch, CURLOPT_POSTFIELDS, $payload);
// Set HTTP Header for POST request
curl_setopt($ch, CURLOPT_HTTPHEADER, array(
'Content-Type: application/json',
'Content-Length: ' . strlen($payload))
);
// Submit the POST request
$result = curl_exec($ch);
echo $result;
// Close cURL session handle
curl_close($ch);
$json = '{"ts":"date","payload":{"Temperature":24,"LEDOn":true}}';
$arr=json_decode($json, true);
echo '
<pre>';
print_r($arr);
echo '</pre>
';
$dt = date(DateTime::ISO8601);
$carss = array
(
"ts"=>$dt,
"payload"=>array("Temperature"=>22,"LEDOn"=>0)
);
$payload = json_encode($carss);
echo "==>".$payload;
$token = '2HSmdfzsEAXB3puVUTi6ZoirV';
// Prepare new cURL resource
$ch = curl_init('https://cloud4rpi.io/api/devices/'.$token.'/data');
curl_setopt($ch, CURLOPT_RETURNTRANSFER, true);
curl_setopt($ch, CURLINFO_HEADER_OUT, true);
curl_setopt($ch, CURLOPT_POST, true);
curl_setopt($ch, CURLOPT_POSTFIELDS, $payload);
// Set HTTP Header for POST request
curl_setopt($ch, CURLOPT_HTTPHEADER, array(
'Content-Type: application/json',
'Content-Length: ' . strlen($payload))
);
// Submit the POST request
$result = curl_exec($ch);
echo $result;
// Close cURL session handle
curl_close($ch);
?>
Menerima paket UDP dan meneruskan ke URL atau website
Gunakan script phyton ini:
import socket, urllib2

UDP_IP = "127.0.0.1"
UDP_PORT = 50000

sock = socket.socket(socket.AF_INET, # Internet
                     socket.SOCK_DGRAM) # UDP
#sock.bind((UDP_IP, UDP_PORT))
sock.bind(("", UDP_PORT)) #bind, receive from any addresss

while True:
 data, addr = sock.recvfrom(1024) # buffer size is 1024 bytes
 print "received message:", data
 stringdata = str(data)
 if stringdata[0] == "+":
 value = stringdata[2]
 karakter = ord(loket)
 karakter = karakter + 1;
 value = chr(karakter)
 url = "http://localhost/getUDP.php?var="+value
 print "url:", url
 response = urllib2.urlopen(url)
 headers = response.info()
 data = response.read()
 print data
Autoplay Video pada HTML
bagian html, isikan:
<html>
<head>Video playlist</head>
<body>

<video autoplay id="myVideo" width="480" height="326" style="object-fit: fill;">
Browser tidak mendukung video
</video>

<script src='video/list.php'></script>

<script type="text/javascript">
var videoSource = new Array();
for(var x=0; x<=files.length; x++){
    videoSource[x]='http://localhost/antrian/video/'+files[x]+'.mp4';
}

var videoCount = videoSource.length;

document.getElementById("myVideo").setAttribute("src",videoSource[0]);

function videoPlay(videoNum)
{
    document.getElementById("myVideo").setAttribute("src",videoSource[videoNum]);
    document.getElementById("myVideo").load();
    document.getElementById("myVideo").play();
}

document.getElementById('myVideo').addEventListener('ended',myHandler,false);

var i=0;
function myHandler() {
    i++;
    if(i == (videoCount-1)){
        i = 0;
        videoPlay(i);
    }else{
        videoPlay(i);
    }
}

</body>
</html>
lalu buat file list.php pada direktory video, dengan mengisikan script berikut:
var files = <?php $out = array();
foreach (glob('*.mp4') as $filename) {
$p = pathinfo($filename);
$out[] = $p['filename'];
}
echo json_encode($out); ?>;
selanjutnya taruh file video dengan format mp4 ke direktori video
Menambahkan direktori alias pada apache2
buka file 000-default.conf
sudo leafpad /etc/apache2/sites-enabled/000-default.conf
tambahkan script dibawah DocumentRoot /var/www/html sebagai berikut
Alias /logo "/home/pi/logo"
<Directory "/home/pi/logo">
    Options FollowSymLinks
    AllowOverride None
    Require all granted
</Directory>
Gunakan tab sebagai indent, wajib indent!