Kategori: Semua Catatan
Current Sense Resistor, Shunt Resistor
Here is a practical example of shunt resistor selection for an MPPT based solar charge controller circuit. The below circuit uses LT3652, an MPPT charge controller from Linear Technology (Analog devices). However, If we look carefully, the battery that will be charged through this circuit is the load.
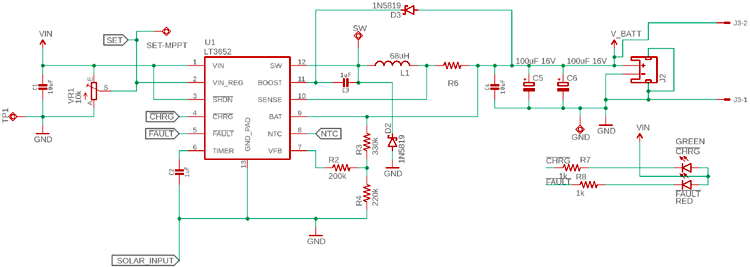
The load is connected using a shunt resistor R6. The R6 will determine the charge current, which means the voltage drop of this R6 will remain constant in every case as V = I x R. The R will be constant, the V will be constant, the driver will change the charge current.
To select the shunt resistor, the following things will be required-
- The constant voltage that will be used by the driver IC LT3652
- The maximum charge current that is required to be delivered to the battery through the resistor.
- Since it is a charge controller tolerance could be 1%.
As per the LT3652 datasheet, the sense pin will use 100 mV (0.1V) sense voltage that will be constant. Also, the maximum charge current LT3652 supports is 2A. Thus, the Shunt Resistor value needs to be R = V / I or Shunt resistor value will be 0.1V / 2A = 0.05 Ohms or 50 mili-ohms.
The power rating of this resistor needs to be P = I2R or P = 22 x 0.05 = 0.2 Watt. The close value of the shunt resistor will be 50 mili-ohms, 1% rated, 0.25 Watt. But instead of 0.25 Watt, 0.375 Watt is the safe resistor wattage that can be used.
Membuat Motion Capture
Mosfet
Joystick Diamond Algorithm
“Proper” mixing is open to debate :-).
An issue is that you have to make decisions about how fast a track is moving under pure signals from a single pot and what to do when signals from the other pot are included. For example, if you push the FB (Forward-Backward pot fully forwards, and if both motors then run at full speed ahead, how do you deal with the addition of a small amount of LR (Left-Right) pot being added. To get rotation you have to have one track going faster that the other. So, if you are already running at maximum forwards speed on both motors you must decrease one or other track speed in order to turn. But, if you had been standing still you would have accelerated one or other track to achieve the same result.
So, all that said, here is a simple off-the-cuff starting solution out of my head which seems like good start.
If pots are mechanically independant then both can be at 100% simultaneously.
If both are on a joystick type arrangement, if Yaxis = 100% and Xaxis = 0%, then adding some B will usually reduce A. A joystick could be constructed where the above is not true, but these are unusual.
Assume that the joystick is of the type that increasing Y% when X = 100% will reduce X. Other assumptions can be made.
FB = front-back pot. Centre zero, +Ve for forward motion of pot
LR = Left right pot. Centre zero. +Ve for pot at right.
K is a scale factor initially 1.
If any result exceeds 100% then adjust K so result = 100% and use same K value for other motor also.
- eg if Left motor result = 125 and Right motor result = 80 then.
As 125 x 0.8 = 100, set K = 0.8. Then.
Left = 125 x 0.8 = 100%. Right = 80 x 0.8 = 64%.
Then:
- Left motor = K x (Front_Back + Left_Right)
- Right motor = K x (Front_Back – Left_Right)
Sanity checks:
- LR = 0 (centered), FB = full fwd -> Both motors run full forwards.
- LR = full left, FB = 0 ->
Left motor runs full backwards,
Right motor runs full forwards.
Vehicle rotates anti clockwise. - FB was 100%, Lr = 0%. Add 10% of LR to right.
L = FB+LR = 100%- + 10% R = FB-LR = 100%- – 10%
If largest axis < 100%, scale until = 100%.
Then scale other axis by same amount.
PTZ Control on ONVIF Standard in C#
Looking at highly price Camera SDK to handle ONVIF Standard, I decided to build some code to control PTZ camera movement using C#.
It it a nice tutorial video by Onvif Channel. That video describes basic step to make a C# project on visual studio. Unfortunately, I can’t get it work for my camera. I’m having YooSee camera GW-1113 which is already support PTZ Control.
There is another tutorial in CodeProject to use PTZ Control. My code is always get a closed connection message from the camera. Both using password or nor, it alway failed. Next, I got nice tool to cek my Onvif Camera. It can detect camera’s IP, port, display video stream and controlling camera using PTZ. You can get it here https://sourceforge.net/projects/onvifdm/ Afterward, I got IP, Port, and service.
With correct IP, Password, port and service address, it still error on getProfiles() command. I inisiate to find tool to debug Onvif request. I grab this tool in this forum https://support.yooseecamera.com/threads/233/ Nice step by step tutorial with pictures. I made my dummy service and dump post header request and then save it into textfile. Here is PHP code i got from // https://gist.github.com/magnetikonline/650e30e485c0f91f2f40 to dump request. I save it on http://localhost:5000/onvif/device_service/index.php
<?php

class DumpHTTPRequestToFile {

	public function execute($targetFile) {

		$data = sprintf(
			"%s %s %s\n\nHTTP headers:\n",
			$_SERVER['REQUEST_METHOD'],
			$_SERVER['REQUEST_URI'],
			$_SERVER['SERVER_PROTOCOL']
		);

		foreach ($this->getHeaderList() as $name => $value) {
			$data .= $name . ': ' . $value . "\n";
		}

		$data .= "\nRequest body:\n";

		file_put_contents(
			$targetFile,
			$data . file_get_contents('php://input') . "\n"
		);

		echo("Done!\n\n");
	}

	private function getHeaderList() {

		$headerList = [];
		foreach ($_SERVER as $name => $value) {
			if (preg_match('/^HTTP_/',$name)) {
				// convert HTTP_HEADER_NAME to Header-Name
				$name = strtr(substr($name,5),'_',' ');
				$name = ucwords(strtolower($name));
				$name = strtr($name,' ','-');

				// add to list
				$headerList[$name] = $value;
			}
		}

		return $headerList;
	}
}


(new DumpHTTPRequestToFile)->execute('./dumprequest.txt');
exit();
And here are resutl I got from C# and Device Test Tool
POST /onvif/device_service/index.php HTTP/1.1

HTTP headers:
Host: localhost
Expect: 100-continue
Accept-Encoding: gzip, deflate
Connection: Keep-Alive

Request body:
<?xml version="1.0" encoding="utf-8"?><s:Envelope xmlns:s="http://www.w3.org/2003/05/soap-envelope"><s:Body xmlns:xsi="http://www.w3.org/2001/XMLSchema-instance" xmlns:xsd="http://www.w3.org/2001/XMLSchema"><GetCapabilities xmlns="http://www.onvif.org/ver10/device/wsdl" /></s:Body></s:Envelope>
POST /onvif/device_service/index.php HTTP/1.1

HTTP headers:
Host: localhost
Accept: */*

Request body:
<?xml version="1.0" encoding="utf-8"?><s:Envelope xmlns:s="http://www.w3.org/2003/05/soap-envelope"><s:Body xmlns:xsi="http://www.w3.org/2001/XMLSchema-instance" xmlns:xsd="http://www.w3.org/2001/XMLSchema"><GetCapabilities xmlns="http://www.onvif.org/ver10/device/wsdl" /></s:Body></s:Envelope>
Above was C# request, while next into it was Tool request You can see that the difference is only at HTTP headers section. Thus, I have to remove Expect:100-continue , gzip compression and Keep-Alive Connection (oprional). As well as add an Accept type.
            try
            {
                var messageElement = new TextMessageEncodingBindingElement()
                {
                    MessageVersion = MessageVersion.CreateVersion(
                      EnvelopeVersion.Soap12, AddressingVersion.None)
                };

                HttpTransportBindingElement httpBinding = new HttpTransportBindingElement()
                {
                    AuthenticationScheme = AuthenticationSchemes.Digest

                };
                //remove compression
                httpBinding.DecompressionEnabled = false;
                // remove keep alive
                httpBinding.KeepAliveEnabled = false;


                CustomBinding bind = new CustomBinding(messageElement, httpBinding);
                // Remove Expect
                ServicePoint servicePoint =
                    ServicePointManager.FindServicePoint(service_uri);
                servicePoint.Expect100Continue = false;

                if (searchServiceUri)
                {
                    // now execute some service operation
                    Device.DeviceClient device = new Device.DeviceClient(bind,
                      new EndpointAddress(service_uri));
                    device.ClientCredentials.HttpDigest.AllowedImpersonationLevel =
                      System.Security.Principal.TokenImpersonationLevel.Impersonation;
                    device.ClientCredentials.HttpDigest.ClientCredential.UserName = userName;
                    device.ClientCredentials.HttpDigest.ClientCredential.Password = password;

                    Device.Capabilities cap = device.GetCapabilities(null);

                }
Later I got nice php script to controlling PTZ at https://github.com/sergejey/majordomo-onvif/blob/master/modules/onvif/class.ponvif.php
Menggunakan SharpDX untuk Joystick
Tambahkan paket NuGet SharpDX.DirectInput
using System;
using System.Threading;

using SharpDX.DirectInput;

namespace PanelRosita
{

    public enum ButtonState : int
    {
        Idle = -1,
        Released = 0,
        Pressed = 128
    }

    public class JoystickThread
    {
        public Thread thr;
        public bool conditionToExitReceived = false;
        public bool isJoystickDetected = false;

        public JoystickThread(string name)
        {

            // detecting joystick
            // Initialize DirectInput
            var directInput = new DirectInput();

            // Find a Joystick Guid
            var joystickGuid = Guid.Empty;

            var devInstance = new DeviceInstance();

            foreach (var deviceInstance in directInput.GetDevices(DeviceType.Gamepad,
                        DeviceEnumerationFlags.AllDevices))
            {
                joystickGuid = deviceInstance.InstanceGuid;
                devInstance = deviceInstance;
            }

            // If Gamepad not found, look for a Joystick
            if (joystickGuid == Guid.Empty)
                foreach (var deviceInstance in directInput.GetDevices(DeviceType.Joystick,
                        DeviceEnumerationFlags.AllDevices))
                {
                    joystickGuid = deviceInstance.InstanceGuid;
                    devInstance = deviceInstance;
                }

            // If Joystick not found, throws an error
            if (joystickGuid == Guid.Empty)
            {
                Console.WriteLine("No joystick/Gamepad found.");
                conditionToExitReceived = true;
                throw new Exception("No joystick/Gamepad found.");
            }

            // Instantiate the joystick
            var joystick = new Joystick(directInput, joystickGuid);
            Console.WriteLine("Found Joystick/Gamepad with GUID: {0}", joystickGuid);


            thr = new Thread(() => RunThread(joystick) );
            thr.Name = name;
            thr.Start();
            isJoystickDetected = true;
        }

        // Enetring point for thread
        void RunThread(Joystick joystick)
        {


            // Query all suported ForceFeedback effects
            Console.WriteLine("Effect:");
            var allEffects = joystick.GetEffects();
            foreach (var effectInfo in allEffects)
                Console.WriteLine("Effect available {0}", effectInfo.Name);

            // Set BufferSize in order to use buffered data.
            joystick.Properties.BufferSize = 128;

            // Acquire the joystick
            joystick.Acquire();

            try
            {
                while (true)
                {
                    if (conditionToExitReceived) // what im waiting for...
                    {
                        Console.WriteLine("Thread is finished");
                        break;
                    }
                    Thread.Sleep(10); // wait 1 second for something to happen.
                    doStuff(ref joystick);
                }
                //perform cleanup if there is any...

            }
            catch (ThreadAbortException ex)
            {
                Console.WriteLine("Thread " + thr.Name + " is aborted and the code is "
                                                 + ex.ExceptionState);
            }
        }

        private void doStuff(ref Joystick joystick)
        {

            try
            {
                joystick.Poll();


                var datas = joystick.GetBufferedData();
                foreach (var state in datas)
                {
                    JoystickButtonPressedEventArgs args = new JoystickButtonPressedEventArgs();
                    JoystickButtonPOVEventArgs povargs = new JoystickButtonPOVEventArgs();
                    args.Value = (ButtonState)state.Value;
                    args.ButtonOffset = state.RawOffset;
                    args.TimeStamp = DateTime.Now;

                    povargs.Value = state.Value;

                    if (state.Offset == JoystickOffset.Buttons0)
                    {
                        OnJoystickButton0(args);
                    }
                    if (state.Offset == JoystickOffset.PointOfViewControllers0)
                    {
                        OnJoystickPointOfViewControllers0(povargs);
                    }

                    if (state.Offset != JoystickOffset.X && state.Offset != JoystickOffset.Y && state.Offset != JoystickOffset.RotationZ)
                    {
                        Console.WriteLine("Joystick: " + state);
                    }
                }
            }
            catch (Exception ee)
            {
                OnJoystickDisconnected(ee.Message);
                conditionToExitReceived = true;
                Console.WriteLine("Joystick: " + ee);
                isJoystickDetected = false;
            }
        }

        public class JoystickButtonPressedEventArgs : EventArgs
        {
            public ButtonState Value { get; set; }
            public int ButtonOffset { get; set; }
            public DateTime TimeStamp { get; set; }
        }
        public class JoystickButtonPOVEventArgs : EventArgs
        {
            public int Value { get; set; }
            public int ButtonOffset { get; set; }
            public DateTime TimeStamp { get; set; }
        }

        public event EventHandler<String> OnDisconnected0;
        protected virtual void OnJoystickDisconnected(String e)
        {
            EventHandler<String> handler = OnDisconnected0;
            if (handler != null)
            {
                handler(this, e);
            }
        }

        public event EventHandler<JoystickButtonPressedEventArgs> OnButton0;
        protected virtual void OnJoystickButton0(JoystickButtonPressedEventArgs e)
        {
            EventHandler<JoystickButtonPressedEventArgs> handler = OnButton0;
            if (handler != null)
            {
                handler(this, e);
            }
        }
        public event EventHandler<JoystickButtonPOVEventArgs> OnPointOfViewControllers0;
        protected virtual void OnJoystickPointOfViewControllers0(JoystickButtonPOVEventArgs e)
        {
            EventHandler<JoystickButtonPOVEventArgs> handler = OnPointOfViewControllers0;
            if (handler != null)
            {
                handler(this, e);
            }
        }


    }
}
Penggunaan
       JoystickThread jt;
       private void Form1_Load(object sender, EventArgs e)
        {
            ConnectingToJoystick(FindingJoystick());
        }


        private void ErrorBox(string v)
        {
            MessageBox.Show(v,Application.ProductName, MessageBoxButtons.OK, MessageBoxIcon.Error, MessageBoxDefaultButton.Button1);
        }

        private void ConnectingToJoystick(bool joystickDetected)
        {
            if (joystickDetected)
            {
                try
                {
                    jt = new JoystickThread("JoyStick");
                    if (jt.isJoystickDetected)
                    {
                        //add all event here
                        jt.OnButton0 += Jt_OnButton0;
                        jt.OnDisconnected0 += Jt_OnDisconnected0;
                        jt.OnPointOfViewControllers0 += Jt_OnPointOfViewControllers0;
                        jt.isJoystickDetected = true;
                    }
                    else {
                        ErrorBox("Joystick tidak terdeteksi atau tidak kompatibel");
                    }
                }
                catch (Exception ee)
                {
                    ErrorBox("Joystick:" + ee.Message);
                }
            }
        }


        private static bool FindingJoystick()
        {
            Boolean joystickDetected = false;

            // Initialize DirectInput
            var directInput = new DirectInput();

            while (!joystickDetected)
            {

                var devInstance = new DeviceInstance();

                // Find a Joystick Guid
                var joystickGuid = Guid.Empty;

                foreach (var deviceInstance in directInput.GetDevices(DeviceType.Gamepad,
                            DeviceEnumerationFlags.AllDevices))
                {
                    joystickGuid = deviceInstance.InstanceGuid;
                    devInstance = deviceInstance;
                }

                // If Gamepad not found, look for a Joystick
                if (joystickGuid == Guid.Empty)
                    foreach (var deviceInstance in directInput.GetDevices(DeviceType.Joystick,
                            DeviceEnumerationFlags.AllDevices))
                    {
                        joystickGuid = deviceInstance.InstanceGuid;
                        devInstance = deviceInstance;
                    }

                // If Joystick not found, throws an error
                if (joystickGuid == Guid.Empty)
                {
                    Console.WriteLine("No joystick/Gamepad found.");
                    DialogResult rst = MessageBox.Show("Joystick tidak ditemukan atau tidak terhubung. Hubungkan joystick dan klik RETRY, atau klik CANCEL untuk tidak menggunakan joystick.", Application.ProductName, MessageBoxButtons.RetryCancel, MessageBoxIcon.Warning);
                    if (rst == DialogResult.Cancel)
                    {
                        return joystickDetected;
                    }
                }
                else
                {
                    joystickDetected = true;
                }
            }
            return joystickDetected;
        }

       private void Jt_OnDisconnected0(object sender, string e)
        {
            //stop robot

            //Finding joystick
            DialogResult rst = MessageBox.Show("No Joystick found. Please Connect the joystick.", Application.ProductName, MessageBoxButtons.RetryCancel, MessageBoxIcon.Warning);
            if (rst == DialogResult.Retry)
            {
                ConnectingToJoystick(FindingJoystick());
            }
        }

        private void Jt_OnPointOfViewControllers0(object sender, JoystickThread.JoystickButtonPOVEventArgs e)
        {
            MessageBox.Show("POV value: "+e.Value.ToString());
        }

        private void Jt_OnButton0(object sender, JoystickThread.JoystickButtonPressedEventArgs e)
        {
            String state = "";
            if (e.Value == ButtonState.Pressed)
                state = "Pencet";
            else
                state = "Lepas";

            //Invoke state to button1
            //button1.Invoke(new Action(() => button1.Text = state));

        }


        //Add event on FormClosing to release object
        private void Form1_FormClosing(object sender, FormClosingEventArgs e)
        {
            if (jt != null)
            {
                //force to abort
                //jt.thr.Abort("aborted from Main");

                //ask thread to exit polling
                jt.conditionToExitReceived = true;

                // Waiting for a thread to terminate.
                jt.thr.Join();
                Console.WriteLine(jt.thr.Name + " is terminate");
            }
        }
Tutorial CefSharp
Buka Menu: Project -> Manage NuGet Package
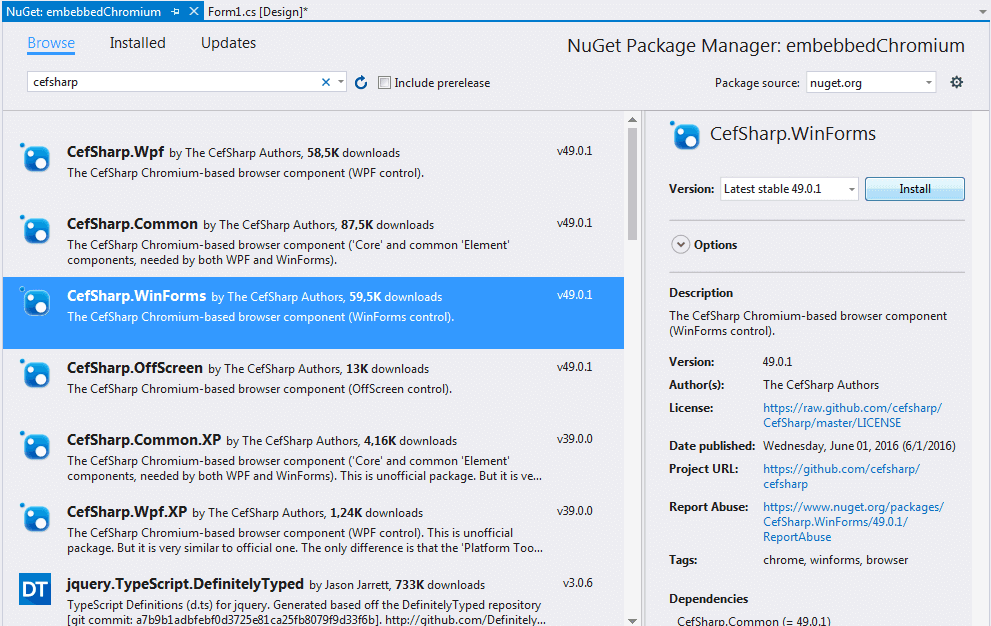
Ganti Target Net 4.5.2 keatas dan platform configuration (x86, x64 or AnyCPU)
Perbaiki file .csproj
Tambahkan sebelum tag </PropertyGroup>

<CefSharpAnyCpuSupport>true</CefSharpAnyCpuSupport>Configuration Error
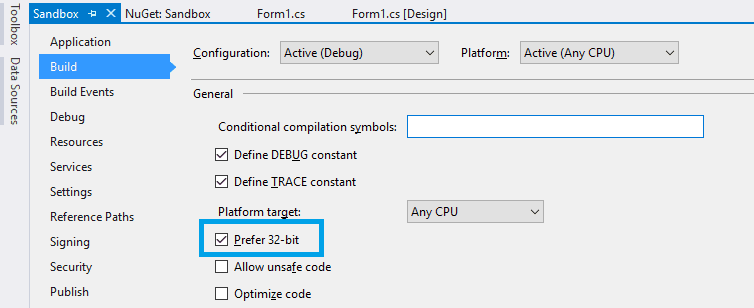
jika menemukan: Please check to make sure that you have specified a valid combination of Configuration and Platform for this project. Maka buka
Klik kanan Project > Properties > Build lalu cut pada bagian Output Path. Selanjutnya Build project lalu paste lagi di tempat semula. Selanjutnya silahkan coba rebuild lagi.
program.cs
using System;
using System.Collections.Generic;
using System.Linq;
using System.Threading.Tasks;
using System.Windows.Forms;

using CefSharp;
using CefSharp.WinForms;
using System.IO;

namespace WindowsFormsApplication1
{
    static class Program
    {
        /// <summary>
        /// The main entry point for the application.
        /// </summary>
        [STAThread]
        static void Main()
        {
            Cef.EnableHighDPISupport();

            var settings = new CefSettings()
            {
                //By default CefSharp will use an in-memory cache, you need to specify a Cache Folder to persist data
                CachePath = Path.Combine(Environment.GetFolderPath(Environment.SpecialFolder.LocalApplicationData), "CefSharp\\Cache")
            };
            //Example of setting a command line argument
            //Enables WebRTC
            settings.CefCommandLineArgs.Add("enable-media-stream");

            //Perform dependency check to make sure all relevant resources are in our output directory.
            Cef.Initialize(settings, performDependencyCheck: true, browserProcessHandler: null);

            Application.EnableVisualStyles();
            Application.SetCompatibleTextRenderingDefault(false);
            Application.Run(new Form1());
        }
    }
}
Form1.cs
using System;
using System.Collections.Generic;
using System.ComponentModel;
using System.Data;
using System.Drawing;
using System.Linq;
using System.Text;
using System.Threading.Tasks;
using System.Windows.Forms;

using CefSharp;
using CefSharp.WinForms;

namespace WindowsFormsApplication1
{
    public partial class Form1 : Form
    {
        public ChromiumWebBrowser chromeBrowser;

        public Form1()
        {
            InitializeComponent();
            InitializeChromium();
        }

        public void InitializeChromium()
        {
            // Create a browser component
            //chromeBrowser = new ChromiumWebBrowser("http://admin:@192.168.43.10/video.cgi");
            chromeBrowser = new ChromiumWebBrowser("http://localhost:8001/camera/mjpeg");
            // Add it to the form and fill it to the form window.
            panel1.Controls.Add(chromeBrowser);
            chromeBrowser.Dock = DockStyle.Fill;

            //Wait for the page to finish loading (all resources will have been loaded, rendering is likely still happening)
            chromeBrowser.LoadingStateChanged += (sender, args) =>
            {
                //Wait for the Page to finish loading
                Console.WriteLine("Loading State Changed GoBack {0} GoForward {1} CanReload {2} IsLoading {3}", args.CanGoBack, args.CanGoForward, args.CanReload, args.IsLoading);
                if (args.CanReload && !args.IsLoading)
                {
                    //chromeBrowser.Reload();
                }
            };

            chromeBrowser.IsBrowserInitializedChanged += OnIsBrowserInitializedChanged;

            //Wait for the MainFrame to finish loading
            chromeBrowser.FrameLoadEnd += (sender, args) =>
            {
                //Wait for the MainFrame to finish loading
//                if (args.Frame.IsMain)
                {
                    Console.WriteLine("MainFrame finished loading Status code {0}", args.HttpStatusCode);
                    if (args.HttpStatusCode == 200)
                    {
                        //finished, OK, streaming end
                        chromeBrowser.Reload();
                    }
                    if (args.HttpStatusCode == -101)
                    {
                        //finished, OK, streaming shut down
                        chromeBrowser.Reload();
                    }
                    if (args.HttpStatusCode == 0)
                    {
                        //The client request wasn't successful.
                        chromeBrowser.Reload();
                    }
                }
            };

        }

        private void ChromeBrowser_FrameLoadEnd(object sender, FrameLoadEndEventArgs e)
        {
            Console.WriteLine("end");
        }

        private void OnLoadingStateChanged(object sender, LoadingStateChangedEventArgs e)
        {
            Console.WriteLine(chromeBrowser.IsLoading);
        }

        private void OnIsBrowserInitializedChanged(object sender, EventArgs e)
        {
            var b = ((ChromiumWebBrowser)sender);

            this.InvokeOnUiThreadIfRequired(() => b.Focus());
        }

        private void button1_Click(object sender, EventArgs e)
        {
            string url = textBox1.Text;
            if (Uri.IsWellFormedUriString(url, UriKind.RelativeOrAbsolute))
            {
                chromeBrowser.Load(url);
            }
        }
    }


    public static class ControlExtensions
    {
        /// <summary>
        /// Executes the Action asynchronously on the UI thread, does not block execution on the calling thread.
        /// </summary>
        /// <param name="control">the control for which the update is required</param>
        /// <param name="action">action to be performed on the control</param>
        public static void InvokeOnUiThreadIfRequired(this Control control, Action action)
        {
            //If you are planning on using a similar function in your own code then please be sure to
            //have a quick read over https://stackoverflow.com/questions/1874728/avoid-calling-invoke-when-the-control-is-disposed
            //No action
            if (control.Disposing || control.IsDisposed || !control.IsHandleCreated)
            {
                return;
            }

            if (control.InvokeRequired)
            {
                control.BeginInvoke(action);
            }
            else
            {
                action.Invoke();
            }
        }
    }
}
Printer POS USB menggunakan PHP
<?php
$tmpdir = sys_get_temp_dir();   # ambil direktori temporary untuk simpan file.
$file =  tempnam($tmpdir, 'ctk');  # nama file temporary yang akan dicetak (Windows, samba)

$handle = fopen($file, 'w');


//Printer parameter (ESC POS Command)
$initialized = chr(27).chr(64);

$justify = Chr(27) . Chr(97);
$left = Chr(0); $center = Chr(1);$right = Chr(2);

$fontwidth = Chr(27).Chr(87);
$doublewidth = Chr(1); $normalwidth = Chr(0);

$LF = Chr(10);

//Start making data
$Data  = $initialized;
$Data .= $fontwidth.$doublewidth;
$Data .= $justify.$center;
$Data .= "NAMA TOKO"."\n";
$Data .= $fontwidth.$normalwidth;
$Data .= "Alamat Toko"."\n";
$Data .= $LF.$LF;

//Write data to temporary file
fwrite($handle, $Data);
fclose($handle);

//WIN: send temporary file to nerwork shared printer (share your printer)
//LINUX: send data directly to device
if (strtoupper(substr(PHP_OS, 0, 3)) === 'WIN'){ //Win
    copy($file, "//localhost/POS-58");  # Shared Printer as POS-58
}else if (strtoupper(substr(PHP_OS, 0, 3)) === 'LIN'){ //Linux
    $device = "/dev/usb/lp0";           # Print at lp0, find it using lsusb! Use udev for managing user access
    if (is_writable($device)) {
        $fp =fopen($device, "w");
        if($fp) {
            fwrite($fp, $Data);
            fclose($fp);
        }
    }
}

unlink($file);
//echo $Data;

?>
Cara mencetak ke printer POS menggunakan PHP. Skrip ini mencontohkan jika menggunakan Windows maupun Linux.
Untuk menggunakan Windows maupun Linux, printer dibuat menjadi akses bersama (shared printer) terlebih dahulu lalu beri nama, misalnya: POS-58. Pastikan bisa diakses di //ALAMAT_IP/NAMA_PRINTER. Untuk skrip ini, menggunakan //localhost/POS-58 Untuk di Windows, buka di Control Panel, pastikan printer yang di-share sudah tersedia dan online.
Sedangkan jika menggunakan Linux, cari nama device dengan perintah:
ls /dev/usbalamat device printer akan diawali dengan lpx, dimana x bisa 0,1,2 atau angka yang lain. Bagaimana bisa memastikan mana alamat device yang benar? gunakan perintah berikut:
echo "Test Printer" >> /dev/usb/lp0 Jika printer bisa mencetak, berarti alamat printer adalah benar, yaitu /dev/usb/lp0 jika salah ganti angka 0 dengan angka 1 atau 2 atau angka lain hingga printer bisa mencetak. Pada skrip ini, alamat device perinter adalah /dev/usb/lp0
Install Font di NSIS
Unduh file berikut, taruh script header .nsh di folder include, dan library .dll di folder plugins (atau plugins/x86_ansi) jika menggunakan Windows 64bit
https://nsis.sourceforge.io/mediawiki/images/7/78/FontName-0.7.zip (installer, pindah FileName.dll ke x86_ansi jika OS 64bit) atau unduh https://file.io/yBr4UoFl
!include FontReg.nsh
!include FontName.nsh
!include WinMessages.nsh

StrCpy $FONT_DIR $FONTS
!insertmacro InstallTTFFont "SiapCetak\settings\fonts\SR.ttf"
SendMessage ${HWND_BROADCAST} ${WM_FONTCHANGE} 0 0 /TIMEOUT=5000
Jika menggunakan GDI
!include WinMessages.nsh

System::Call "GDI32::AddFontResourceA(t) i ('SR.ttf') .s"
Pop $0
# $0 is zero if the function failed
SendMessage ${HWND_BROADCAST} ${WM_FONTCHANGE} 0 0 /TIMEOUT=5000
Mencari lokasi MyDocument
Function "GetMyDocs"
  ReadRegStr $0 HKCU \
             "SOFTWARE\Microsoft\Windows\CurrentVersion\Explorer\Shell Folders" \
             Personal
FunctionEnd

Call "GetMyDocs"
$MyDocs = $0