Urutan gerbong dari barat ke timur:
B4-B3-B2-B1-E?
Posisi tempat duduk kereta bisnis

B4-B3-B2-B1-E?

Cara ubah desain eagle ke flatcam, bisa lihat artikel berikut: Eagle to FlatCAM


Isikan parameter tersebut, mulai dari ukuran milling (bor) 0.7 mm dengan jenis C1. Passes diisi 1 menandakan 1 kali guratan. Overlap biasanya 10%, jadi jika passesnya lebih dari 1, jaur yang overlaping 10% (Dalam hal ini jika milling 0.7mm, mmaka overlapnya 0.07mm). Centang bagian combine jika iki menyatikan file hasil geometry-nya.

Isikan parameter di atas jika menggunakan VBit ukuran 0.2mm (diisikan 0.3mm untuk offset). Passes disarankan minimal 2, agar guratan agak lebar untuk mencegah konsleting. Pastikan juga check bagian Combine agar geometri menjadi 1 file.
Pastikan untuk mencentang Check Validity untuk memastikan semua jalur dapat dibentuk geometry-nya. Jika sudah komplit isiannya, klik tombol [Generate Geometry]

Isikan parqameter di atas untuk kasus bor 0.7mm s.d 0.8mm. Diameter mill adalah 0.7 dengan bentuk C1. Cut Z adalah seberapa dalam tembaga PCB akan dikelupas. Untuk PCB dengan tebal 1 oz, sejatinya adalah 0.035mm tebal tembaganya. Namun, saat mill sudah mulai tumpul atau PCB tidak rata, maka di atas ditambahkan dalamnya guratan sebesar -0.050mm. Centang Multi-Depth agar guratan pertama adalah -0.040 dilanjutkan guratan kedua untuk membersikan sisa tembaga -0.050mm. Jika menggunakan karet Cone, Cut Z cukup diisi -0.040, dan pastikan mill tajam.

Isikan parameter di atas untuk bor V-bit dengan diameter 0.2mm. Walaupun ukuran 0.2mm disarankan di-set ke 0.3mm sebagai offset. Walaupun dengan bentuk nya V, namun perlu dipilih C1 agar bisa diset kedalaman guratannya. Cut-Z cukup setebal PCB dan pastikan saat autolevel menggunakan karet bentuk Cone, untuk memastikan PCB tertekan penuh ke bawah.
Travel Z adalah seberapa tinggi mill bergerak saat pindah ke titik lain. Pastikan tingginya melebihi dari ketebalan PCB. Untuk PCB 1 oz, bisa gunakan 2 atau lebih, dimana tebal PCB hanya 1.78mm. Feedrate X-Y adalah kecepatan gerak mill. Gunakan 180 mm/s untuk kecepatan sedang. Feedrate Z 60 mm/s untuk kecepatan pengeboran sedang. Untuk CNC yang ketinggiannya kurang dari 5 cm, disarankan mengganti End Move Z menjadi 10mm. Lanjutkan dengan klil tombol [Generate CNCJob Object]

Lanjutkan dengan membuat kode GCODE untuk dapat dibaca oleh CNC. Cukup dengan membuka menu CNC Job Object dan klil tombol [Save CNC Code]
Excellon Object, atau titik pengeboran

Buka menu Excellon Object, tentukan lubang dengan ukuran berapa yang akan dibor. Jika semua lubang, cukup klik tanda pagar, semua lubang akan terpilih. Lanjutkan dengan klik tombol [Drilling Tool]
Pembuatan CNC Object untuk pengeboran

Pilih ukuran lubang PCB atau cukup klik # untuk pilih semua lubang. isikan Cut-Z dengan tebal PCB, untuk pcb dengan tebal 1 oz bisa gunakan -1,78mm atau -1,80mm. Travel Z gunakan 2mm atau sesuaikan dengan ketebalan PCB. Feedrate Z atau kecepatan pengeboran, isikan 120mm/s untuk kecepatan tinggi atau 60mm/s untuk kecepatan sedang. Ganti tool change ke 10mm dan End move Z ke 10mm untuk CNC ketinggian rendah. Klik [Generate CNCjob Object] untuk membuat object CNC

Proses Autoleveling
Proses ini digunakan untuk mendeteksi ketinggian PCB yang nantinya disematkan di GCode. Proses ini dibantu dengan software autoleveler.

Pilih software cnc yang akan digunakan, misalnya Mach3. Buka file GCODE dengan extensi .tap atau .nc maka ukuran otomatis akan msuk ke setting. Isikan ZFeed dengan 100mm/s untuk kecepatan mill mendeteksi ketinggian. Probe depth -1, sehingga saat kedalaman -1mm tidak ditemukan tambaga, maka dianggap jarak tembaga dengan probe maksimal adalah 1mm. Probe clearance diisi 2mm untuk probe bisa bergerak. Isikan nilai ini > ketebalan PCB. Probe spacing 10mm untuk melakukan probe 10mm atau isikan 5mm untuk melakukan probing setiap 5mm. Isikan Z safe height dengan 10mm untuk mesin CNC yang ketinggian rendah. Klik [Create Levelled GCode] untuk membuat kode GCode yang sudah tebenam autoleveling.
Buka file outline, biasanya file .GKO, dan pilih tombol [Cutout Tools]. Selanjutnya mebu berikut akan muncul.

Isikan parameter sesuai dengan gambar di atas. Pilih Kind: Gerber, Type:Gerber. Set diamater mill 0.8mm atau sesuaikan dengan ukuran mill yang digunakan. isikan Cut Z dengan ketebalan PCB, misalnya -1.8mm untuk PCB 1 oz. Dianjutkan untuk menggunakan Multi-depth untuk mill yang berukuran kecil dengan nilai 3mm s.d 5mm dan margin 0.1mm atau sesuai dengan keinginan sebagai batas pemotongan. Isikan Gap size 1mm agar PCB mudah dilepas, atau setidaknya sesuai ukuran mill yang digunakan. Pilih Gaps: LR untuk gap di kiriri dan kanan. LAnjutkan dengan [Generate Geometry] selanjutnya buat Object CNC dan simpan kode CNC sesuai contoh geomatry lain untuk pengeboran.
Gunakan setting berikut untuk penyetikan cepat dengan klik menu File => Backup => Import Setting dengan file berikut. File berikut untuk ketebalan PCB 1oz dengan mill 0.8mm
Password untuk semua file:latiful hayat
Eagle uses Trailing Zeros in its Excellon number format but does not properly report this format in the Excellon file. To tell FlatCAM to use this format by default set this system option excellon_zeros to T by using the set_sys command in the Shell Command Line Interface as shown below:

DS1207 ==> DR73, DR74, DR125, DR1030


Perhitungan Rangkaian MOSFET https://docs.google.com/spreadsheets/d/1IhWH4S8aEpJnCTas4U35n4lytOYMMAx6/edit?usp=sharing&ouid=102566882944780047379&rtpof=true&sd=true
Deskripsi: Belum dicatat
Panduan cepat untuk mengekspor desain PCB dari Eagle dan mengimpornya ke FlatCAM. Panduan ini dibuat dengan Eagle versi 7.2.0 Light dan FlatCAM 8.2.
Sebagian besar desain dimulai dengan skema rangkaian:

Kemudian dengan meng-klik File→Switch to board, editor papan PCB terbuka dan kemudian menyelesaikan tata letak rangkaian:

Untuk ekspor file cam bor, buka File→CAM Processor lagi dan pilih setelan pada gambar di bawah. Pilih EXCELLON_24 untuk bagian Device. Berikan ekstensi drills.drd pada nama file bor jika perlu. Klik Proses Job untuk mengekspor.

Kita sudah selesai dengan Eagle. Sekarang mari beralih ke FlatCAM.
Eagle menggunakan Trailing Zeros dalam format angka Excellon, format ini perlu dilaporkan dengan benar di FlatCaM dengan cara berikut:
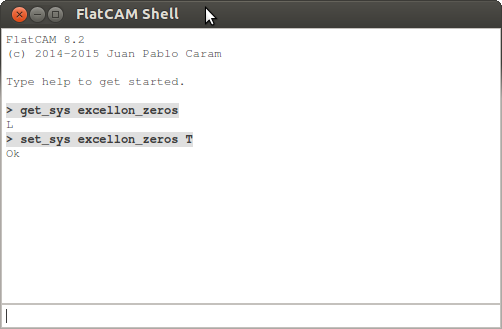
Perubahan pada opsi sistem akan disetel saat memulai ulang, maka FlatCam perlu dijalankan ulang.
Sekarang cukup buka file Gerber dan Excellon yang diekspor dari Eagle.
Cara setting flatmac dapat dilihat di artikel berikut:
Sumber: http://flatcam.org/manual/eaglehowto.html
Jika ingin mengekspor untuk file gerber di layanan produsen PCB semisal JLCPCB atau PCBWAY, gunakan file konfigurasi CAM berikut: Cara Setting FlatCAM
This can be done directly from the webinterface. Just go to Plugins -> Plugin Editor -> select the Plugin SyntaxHighlighter Evolved -> add the snippet to the end
/**
 * Filter to fix issue with & in SyntaxHighlighter Evolved plugin.
 *
 * @param string $code Code to format.
 * @param array $atts Attributes.
 * @param string $tag Tag.
 *
 * @return string
 */
function kagg_syntaxhighlighter_precode( $code, $atts, $tag ) {
    if ( 'code' === $tag ) {
        $code = wp_specialchars_decode( $code );
    }
    return $code;
}
add_filter( 'syntaxhighlighter_precode', 'kagg_syntaxhighlighter_precode', 10, 3 );
Sumber: https://nocin.eu/wordpress-syntaxhighlighter-ampersand-character/
//File: Serial.h
#ifndef SERIALCLASS_H_INCLUDED
#define SERIALCLASS_H_INCLUDED

#include <windows.h>
#include <stdio.h>
#include <stdlib.h>

class Serial
{
    private:
        //Serial comm handler
        HANDLE hSerial;
        //Connection status
        bool connected;
        //Get various information about the connection
        COMSTAT status;
        //Keep track of last error
        DWORD errors;

    public:
        //Initialize Serial communication with the given COM port
        Serial(char *portName);
        //Close the connection
        ~Serial();
        //Read data in a buffer, if nbChar is greater than the
        //maximum number of bytes available, it will return only the
        //bytes available. The function return -1 when nothing could
        //be read, the number of bytes actually read.
        int ReadData(char *buffer, unsigned int nbChar);
        //Writes data from a buffer through the Serial connection
        //return true on success.
        bool WriteData(char *buffer, unsigned int nbChar);
        //Check if we are actually connected
        bool IsConnected();


};

#endif // SERIALCLASS_H_INCLUDED
//File: Serial.cpp
#include "Serial.h"

Serial::Serial(char *portName)
{
    //We're not yet connected
    this->connected = false;

    //Try to connect to the given port throuh CreateFile
 #if _MSC_VER && !__INTEL_COMPILER
    const size_t cSize = strlen(portName) + 1;
    wchar_t* wc = new wchar_t[cSize];
    mbstowcs_s(NULL, wc, cSize, portName, cSize);
    this->hSerial = CreateFile(wc,
        GENERIC_READ | GENERIC_WRITE,
        0,
        NULL,
        OPEN_EXISTING,
        FILE_ATTRIBUTE_NORMAL,
        NULL);
#else
    //Try to connect to the given port throuh CreateFile
    this->hSerial = CreateFile(portName,
        GENERIC_READ | GENERIC_WRITE,
        0,
        NULL,
        OPEN_EXISTING,
        FILE_ATTRIBUTE_NORMAL,
        NULL);
#endif

    //Check if the connection was successfull
    if(this->hSerial==INVALID_HANDLE_VALUE)
    {
        //If not success full display an Error
        if(GetLastError()==ERROR_FILE_NOT_FOUND){

            //Print Error if neccessary
            printf("ERROR: Handle was not attached. Reason: %s not available.\n", portName);

        }
        else
        {
            printf("ERROR!!!");
        }
    }
    else
    {
        //If connected we try to set the comm parameters
        DCB dcbSerialParams = {0};

        //Try to get the current
        if (!GetCommState(this->hSerial, &dcbSerialParams))
        {
            //If impossible, show an error
            printf("failed to get current serial parameters!");
        }
        else
        {
            //Define serial connection parameters for the arduino board
            dcbSerialParams.BaudRate=CBR_9600;
            dcbSerialParams.ByteSize=8;
            dcbSerialParams.StopBits=ONESTOPBIT;
            dcbSerialParams.Parity=NOPARITY;
            //Setting the DTR to Control_Enable ensures that the Arduino is properly
            //reset upon establishing a connection
            dcbSerialParams.fDtrControl = DTR_CONTROL_ENABLE;

             //Set the parameters and check for their proper application
             if(!SetCommState(hSerial, &dcbSerialParams))
             {
                printf("ALERT: Could not set Serial Port parameters");
             }
             else
             {
                 //If everything went fine we're connected
                 this->connected = true;
                 //Flush any remaining characters in the buffers
                 PurgeComm(this->hSerial, PURGE_RXCLEAR | PURGE_TXCLEAR);
                 //We wait 2s as the arduino board will be reseting
                 Sleep(2000);
             }
        }
    }

}

Serial::~Serial()
{
    //Check if we are connected before trying to disconnect
    if(this->connected)
    {
        //We're no longer connected
        this->connected = false;
        //Close the serial handler
        CloseHandle(this->hSerial);
    }
}

int Serial::ReadData(char *buffer, unsigned int nbChar)
{
    //Number of bytes we'll have read
    DWORD bytesRead;
    //Number of bytes we'll really ask to read
    unsigned int toRead;

    //Use the ClearCommError function to get status info on the Serial port
    ClearCommError(this->hSerial, &this->errors, &this->status);

    //Check if there is something to read
    if(this->status.cbInQue>0)
    {
        //If there is we check if there is enough data to read the required number
        //of characters, if not we'll read only the available characters to prevent
        //locking of the application.
        if(this->status.cbInQue>nbChar)
        {
            toRead = nbChar;
        }
        else
        {
            toRead = this->status.cbInQue;
        }

        //Try to read the require number of chars, and return the number of read bytes on success
        if(ReadFile(this->hSerial, buffer, toRead, &bytesRead, NULL) && bytesRead != 0)
        {
            return bytesRead;
        }

    }

    //If nothing has been read, or that an error was detected return -1
    return -1;

}


bool Serial::WriteData(char *buffer, unsigned int nbChar)
{
    DWORD bytesSend;

    //Try to write the buffer on the Serial port
    if(!WriteFile(this->hSerial, (void *)buffer, nbChar, &bytesSend, 0))
    {
        //In case it don't work get comm error and return false
        ClearCommError(this->hSerial, &this->errors, &this->status);

        return false;
    }
    else
        return true;
}

bool Serial::IsConnected()
{
    //Simply return the connection status
    return this->connected;
}
#include <iostream>
#include "windows.h"
#include "Serial.h"

#include <thread>
#include <chrono>

using namespace std;

void delay(int ms){
    std::this_thread::sleep_for (std::chrono::milliseconds(ms));
}

int main(int argc, char** argv) {

    char alamatPort[] = "\\\\.\\COM7";
    Serial* s = new Serial(alamatPort);

	char dataOn[256] = "on1\n"; //"Nyala!";
	char dataOff[256] = "off0\n"; //"mati!";

	cout<<"isikan angka 1 untuk menyalakan, atau 0 untuk mematikan"<<endl;


	int jawab;
	do{
        cin>>jawab;;

        if(jawab==0)
            s->WriteData(dataOff, sizeof(dataOff));
        if(jawab==1)
            s->WriteData(dataOn, sizeof(dataOn));
        if(jawab==2)
            for(int a=0;a<5;a++){
                s->WriteData(dataOn, sizeof(dataOn));
                delay(500);
                s->WriteData(dataOff, sizeof(dataOff));
                delay(500);
            }
	}while(jawab<3);

	return 0;
}
#include <iostream>
#include <stdio.h>
#include <tchar.h>
#include "Serial.h" // Library described above
#include <string>


/* run this program using the console pauser or add your own getch, system("pause") or input loop */
char alamatPort[] = "\\\\.\\COM7";
Serial* SP = new Serial(alamatPort);    // adjust as needed

void* baca(void* data)
{

    char incomingData[256] = "";            // don't forget to pre-allocate memory
    //printf("%s\n",incomingData);
    int dataLength = 256;
    int readResult = 0;


    while (SP->IsConnected())
    {
        readResult = SP->ReadData(incomingData, dataLength);
        if (readResult > 0) {
            printf("%s\n", incomingData);
        }
        //printf("Bytes read: (-1 means no data available) %i\n",readResult);

        //std::string test(incomingData);

        //printf("%s",incomingData);
        //test = "";

        Sleep(500);
    }
    return NULL;
}

void* tulis(void* data)
{
    while (SP->IsConnected())
    {
        char outgoingData[256] = "";
        char keluar[256] = "keluar";
        int dataLength = sizeof(outgoingData);        // don't forget to pre-allocate memory
        scanf_s("%255s", outgoingData, dataLength);

        if (outgoingData != "")
        {
            if (strcmp(outgoingData, "OK") == 0) {
                printf("Pengiriman selesai\n");
                return NULL;

            }
            if (SP->WriteData(outgoingData, dataLength))
            {
                printf("Data send:%s\n", outgoingData);
            }
        }

        Sleep(500);
    }
    // do stuff...
    return NULL;
}

#if _MSC_VER && !__INTEL_COMPILER
#include <thread>

int main(int argc, char** argv) {
    printf("Welcome to the serial test app!\n\n");
    if (SP->IsConnected())
        printf("Serial sudah terhubung\n");
    int status;
    std::thread thrd_1(baca,(void*)0);
    std::thread thrd_2(tulis, (void*)0);

    thrd_1.join();
    thrd_2.join();

}
#else
// thread example
#include <pthread.h>

int main(int argc, char** argv) {
    printf("Welcome to the serial test app!\n\n");
    if (SP->IsConnected())
        printf("Serial sudah terhubung\n");

    pthread_t thrd_1;
    pthread_t thrd_2;
    int status;

    pthread_create(&thrd_1, NULL, baca, (void*)0);
    pthread_create(&thrd_2, NULL, tulis, (void*)0);

    pthread_join(thrd_1, (void**)&status);
    pthread_join(thrd_2, (void**)&status);

    printf("Terima kasih");

    return 0;
}
#endif